Blog

  • How AI Is Reshaping Software Engineering Careers Through New Skills and Roles

    How AI Is Reshaping Software Engineering Careers Through New Skills and Roles

    I started noticing a shift in software engineering conversations long before companies officially announced their AI strategies. Instead of debating programming languages or frameworks, developers were comparing AI coding assistants, discussing prompt quality, and figuring out how these tools fit into their daily workflow. It became clear that the biggest change wasn’t about writing less code. It was about working differently.

    I also realized that many developers were asking the wrong question. Instead of wondering whether AI would replace software engineers, they were trying to understand what employers would expect from engineers in an AI-powered workplace. That perspective makes far more sense because every major technology wave has changed the profession without eliminating it.

    AI Is Changing the Nature of Software Engineering

    AI Is Changing the Nature of Software Engineering

    Artificial intelligence is transforming software engineering from routine code authorship to system orchestration. Instead of manually writing every line of boilerplate code, developers increasingly guide AI tools, review generated solutions, and focus on building reliable systems that solve business problems.

    Modern AI assistants can generate functions, suggest fixes, explain unfamiliar code, and automate repetitive development tasks within seconds. While that improves productivity, it doesn’t remove the need for experienced engineers. Someone still has to decide whether the generated code is secure, scalable, maintainable, and appropriate for the project.

    This shift places greater value on engineering judgment than simply typing syntax quickly.

    The Skills Employers Value More Than Ever

    As AI handles repetitive coding, hiring priorities are evolving. Companies are looking beyond programming languages and placing greater emphasis on broader technical thinking.

    Developers who understand software architecture, system design, distributed applications, cloud infrastructure, and data flow often stand out because these areas require strategic decision-making that AI cannot fully replicate.

    Several skills are becoming increasingly valuable:

    • Systems thinking and architectural design
    • Reviewing AI-generated code for bugs, security risks, and compliance
    • Writing effective prompts for AI development tools
    • Strong debugging and analytical problem-solving
    • Clear communication and collaboration across teams

    Knowing how to delegate repetitive tasks to AI is becoming just as important as knowing how to complete those tasks manually.

    Human Expertise Still Drives Quality

    Human Expertise Still Drives Quality

    AI can generate working code remarkably fast, but speed does not guarantee quality.

    Generated output may contain hidden security vulnerabilities, inefficient logic, outdated libraries, or subtle bugs that only experienced engineers recognize. That’s why output validation has become one of the most valuable engineering skills.

    Industries such as healthcare, finance, cybersecurity, and government technology depend on strict regulations, privacy standards, and business-specific requirements. Generic AI-generated solutions rarely understand those nuances without careful human oversight.

    Developers with deep domain knowledge continue to provide value that extends far beyond writing code.

    Daily Software Development Looks Different Today

    The modern development workflow increasingly combines human expertise with AI assistance.

    Many engineers now begin by describing a feature to an AI coding assistant instead of writing every function from scratch. The AI produces a draft, while the developer evaluates, improves, tests, and integrates the solution into the larger application.

    This approach reduces time spent on repetitive coding while allowing engineers to concentrate on higher-impact responsibilities such as architecture, optimization, performance, and user experience.

    Rather than replacing developers, AI is changing where they spend their attention.

    New Career Opportunities Are Emerging

    New Career Opportunities Are Emerging

    AI isn’t only changing existing jobs. It’s creating entirely new career paths within software engineering.

    Organizations increasingly hire professionals responsible for coordinating AI-powered workflows, managing machine learning infrastructure, and ensuring responsible AI adoption.

    Some emerging roles include:

    • AI Orchestrator or AI Conductor responsible for managing multi-agent workflows and defining system guardrails.
    • MLOps and Platform Engineers who maintain AI deployment pipelines, scalability, monitoring, and infrastructure.
    • AI Ethics and Governance specialists who evaluate fairness, privacy, compliance, security, and responsible data usage.

    These positions combine traditional software engineering principles with modern AI capabilities, opening opportunities for developers willing to expand their expertise.

    How Developers Can Stay Competitive

    Adapting doesn’t require abandoning traditional software engineering skills. Instead, developers should build on their existing foundation while learning how AI fits into professional workflows.

    Continue strengthening computer science fundamentals, algorithms, data structures, databases, networking, and system design. Those concepts remain relevant regardless of which AI tools become popular.

    At the same time, become comfortable using AI assistants as productivity tools rather than shortcuts. Learn when to trust generated code, when to question it, and when to rewrite it entirely.

    Following software engineering career trends in 2026 can also help developers identify which technologies, responsibilities, and employer expectations are evolving before they become industry standards.

    Developers who combine technical expertise with adaptability will remain valuable regardless of how AI continues to evolve.

    FAQs: How AI Is Reshaping Software Engineering Careers Through New Skills and Roles

    1. Will AI replace software engineers?

    AI is more likely to automate repetitive coding tasks than replace software engineers. Human decision-making, architecture, debugging, and communication remain essential.

    2. Which skills should software engineers focus on?

    System design, cloud computing, AI-assisted development, security, debugging, and strong communication are becoming increasingly valuable alongside programming knowledge.

    3. Are junior developers still in demand?

    Yes. Employers continue hiring junior developers, but they increasingly expect candidates to understand AI tools while maintaining strong programming fundamentals.

    4. Which new software engineering careers are growing because of AI?

    Roles such as AI Orchestrator, MLOps Engineer, AI Platform Engineer, and AI Governance Specialist are expanding as organizations integrate AI into software development.

    Why Adaptability Will Always Define Great Engineers

    Every major advancement in software engineering has changed how developers work rather than eliminating the profession altogether. AI is simply the latest evolution. Engineers who embrace continuous learning, strengthen their technical foundation, and use AI thoughtfully will be better positioned for long-term success than those who resist change.

    The future belongs to developers who know how to combine human judgment with intelligent automation instead of choosing one over the other.


  • How to Create CRUD in Laravel: Build It Fast

    How to Create CRUD in Laravel: Build It Fast

    When I first started building Laravel applications, CRUD seemed like a collection of unrelated files and commands. Once I understood how routes, controllers, models, views, and databases communicate, the entire process became much easier.

    In this guide, I will explain how to create CRUD in Laravel through a practical product-management application. The finished project will let users create, view, edit, and delete products while applying validation, pagination, security, and clean coding practices.

    What Does CRUD Mean in Laravel?

    CRUD represents the four basic actions used to manage database records:

    • Create adds a new record.
    • Read retrieves existing records.
    • Update changes a stored record.
    • Delete removes a record.

    Laravel simplifies these operations through Eloquent ORM, resource controllers, resource routes, migrations, and Blade templates. A browser request reaches a route, the route calls a controller method, the controller works with an Eloquent model, and a Blade view displays the response.

    What You Need Before Starting

    Make sure your development environment includes:

    • A compatible PHP version
    • Composer
    • Laravel
    • MySQL, MariaDB, PostgreSQL, or SQLite
    • A code editor
    • Basic PHP knowledge

    Check the requirements of the Laravel version you install because supported PHP versions can change between releases.

    Step 1: Create a Laravel Project

    Step 1 Create a Laravel Project

    Open a terminal and create a fresh project:

    composer create-project laravel/laravel product-manager

    cd product-manager

    Start the local development server:

    php artisan serve

    Open the displayed local address in your browser. You should see Laravel’s welcome page.


    Step 2: Configure the Database

    Create a database called product_manager, then update the database values in the .env file:

    DB_CONNECTION=mysql

    DB_HOST=127.0.0.1

    DB_PORT=3306

    DB_DATABASE=product_manager

    DB_USERNAME=root

    DB_PASSWORD=

    Use credentials that match your database environment. Run php artisan config:clear if Laravel continues using older configuration values.

    Step 3: Generate the Model and Migration

    Step 3: Generate the Model and Migration

    Generate a Product model with a migration:

    php artisan make:model Product -m

    Open the new migration inside database/migrations and define the products table:

    Schema::create(‘products’, function (Blueprint $table) {

        $table->id();

        $table->string(‘name’);

        $table->string(‘sku’)->unique();

        $table->unsignedInteger(‘quantity’)->default(0);

        $table->decimal(‘price’, 10, 2);

        $table->text(‘description’)->nullable();

        $table->timestamps();

    });

    Run the migration:

    php artisan migrate

    The database now contains a structured products table.

    Step 4: Configure the Product Model

    Open app/Models/Product.php and declare the attributes that can be mass assigned:

    protected $fillable = [

        ‘name’,

        ‘sku’,

        ‘quantity’,

        ‘price’,

        ‘description’,

    ];

    The $fillable property prevents unexpected fields from being written through mass-assignment operations.

    Step 5: Create Form Request Validation

    Step 5: Create Form Request Validation

    Generate separate request classes for storing and updating records:

    php artisan make:request StoreProductRequest

    php artisan make:request UpdateProductRequest

    Add suitable rules to each class:

    public function rules(): array

    {

        return [

            ‘name’ => [‘required’, ‘string’, ‘max:255’],

            ‘sku’ => [‘required’, ‘string’, ‘max:100’, ‘unique:products,sku’],

            ‘quantity’ => [‘required’, ‘integer’, ‘min:0’],

            ‘price’ => [‘required’, ‘numeric’, ‘min:0’],

            ‘description’ => [‘nullable’, ‘string’],

        ];

    }

    Adjust the SKU rule in the update request so it ignores the product currently being edited. This allows the existing SKU to remain unchanged while still blocking duplicates belonging to other products.

    Step 6: Generate a Resource Controller

    Create a controller containing the standard resource methods:

    php artisan make:controller ProductController –resource

    The controller should contain these actions:

    Index

    Retrieve products and send them to the list page:

    $products = Product::latest()->paginate(10);

    return view(‘products.index’, compact(‘products’));

    Store

    Validate and create a product:

    Product::create($request->validated());

    return redirect()

        ->route(‘products.index’)

        ->with(‘success’, ‘Product created successfully.’);

    Update

    Validate and update the selected record:

    $product->update($request->validated());

    return redirect()

        ->route(‘products.index’)

        ->with(‘success’, ‘Product updated successfully.’);

    Destroy

    Delete the selected product:

    $product->delete();

    return redirect()

        ->route(‘products.index’)

        ->with(‘success’, ‘Product deleted successfully.’);

    Use route model binding by type-hinting Product $product in methods that work with an existing record.

    Step 7: Register the Resource Route

    Step 7: Register the Resource Route

    Open routes/web.php and add:

    use App\Http\Controllers\ProductController;

    Route::resource(‘products’, ProductController::class);

    This single declaration registers routes for listing, creating, storing, viewing, editing, updating, and deleting products.

    Check the generated routes with:

    php artisan route:list

    Step 8: Create the Blade Views

    Create a products directory inside resources/views. Add these files:

    • index.blade.php
    • create.blade.php
    • show.blade.php
    • edit.blade.php

    The index page should display the product list, pagination links, success messages, and actions for viewing, editing, and deleting records.

    Every form that changes data must include:

    @csrf

    Update forms also need:

    @method(‘PUT’)

    Delete forms require:

    @method(‘DELETE’)

    Display field errors near their inputs and use Laravel’s old() helper to restore submitted values after validation fails. Add a browser confirmation before deletion to reduce accidental removals.

    Step 9: Add Search and Pagination

    Search makes the application more useful as its database grows. Update the index query so it checks the name or SKU when a search term exists, then paginate the result.

    Keep query parameters while moving between pages so the search does not disappear. A clear empty-state message should also explain when no matching products are available.

    Step 10: Test the Application

    Test the complete workflow manually:

    1. Create a valid product.
    2. Submit an incomplete form.
    3. Try a duplicate SKU.
    4. Open the details page.
    5. Edit the product.
    6. Delete the product.
    7. Confirm pagination works.

    Feature tests should verify that pages load, valid records are stored, invalid data is rejected, records are updated, and deleted products disappear from the database.

    Common Laravel CRUD Problems

    Common Laravel CRUD Problems

    A “table not found” error usually means the migration has not run or the application is connected to the wrong database.

    A mass-assignment error commonly means the model is missing its $fillable configuration.

    A route-not-defined message may indicate an incorrect route name or a cached route configuration.

    A method-not-allowed error often happens when update and delete forms do not include the correct method directive.

    Laravel CRUD Security Practices

    Use server-side validation for every submitted form. Keep CSRF protection enabled, escape displayed values through standard Blade syntax, restrict mass assignment, and add authorization before allowing sensitive changes.

    Database security also depends on keeping user input separate from executable queries, so understanding how to prevent SQL injection in PHP is useful when building or reviewing data-driven Laravel applications.

    Authentication confirms who a user is, while authorization determines what that user is permitted to do. Public-facing applications should apply policies or gates instead of allowing every authenticated user to edit every record.

    Frequently Asked Questions

    1. How long does it take to learn how to create CRUD in Laravel?

    A basic application can be completed quickly, but understanding validation, routing, Eloquent, security, and testing requires additional practice.

    2. What is a Laravel resource controller?

    A resource controller organizes the conventional actions needed to create, display, edit, update, and delete a particular application resource.

    3. Can Laravel CRUD work without Blade?

    Yes. Laravel can provide CRUD through JSON APIs, Livewire components, Inertia applications, React interfaces, Vue interfaces, or administration packages.

    4. Why should I use Form Request classes?

    Form Request classes keep validation and authorization logic outside controllers, making the application easier to maintain, test, and expand.

    From Basic Records to Better Applications

    Building this project helped me see CRUD as a connected request lifecycle rather than a set of commands to memorize. The route receives the request, the controller coordinates the work, the model communicates with the database, and the view presents the result.

    As the frontend grows more complex, developers may also explore how to convert JavaScript to TypeScript to add stronger type checking and make larger application codebases easier to maintain.

    I recommend improving the finished project with authentication, authorization, sorting, filters, reusable form components, automated tests, and database backups. Once these foundations are clear, the same approach can support customer directories, inventory systems, task managers, content platforms, and many other applications.

  • Expert Tips On How to Test Website Accessibility For Devs

    Expert Tips On How to Test Website Accessibility For Devs

    A polished website can still frustrate visitors when menus fail without a mouse, images have no descriptions, or forms provide confusing errors. During web projects, I have seen small barriers stop people from completing simple tasks. Learning how to test website accessibility helps developers catch these problems early and create digital experiences that more people can use confidently.

    Key Takeaways

    Automated tools provide a starting point, not a final answer. Test keyboards, screen readers, zoom, forms, and mobile layouts. Review important templates first, document every issue clearly, repair shared components, and retest all changes.

    Why Testing Matters?

    A quick accessibility review can save users from a digital obstacle course.

    Better Experiences

    Understanding how to test website accessibility matters because accessible design improves everyday usability. Clear headings, readable contrast, descriptive links, useful labels, and logical navigation help people with disabilities, older visitors, mobile users, and anyone browsing under difficult conditions.

    Fewer Surprises

    Finding barriers during development is usually easier than repairing them after launch. One missing label in a reusable form component may affect dozens of pages, while one accessible fix can improve them all.

    Testing also gives teams objective quality standards. Developers can compare pages against the Web Content Accessibility Guidelines, commonly called WCAG, instead of relying only on personal judgment.

    What Checkers Find

    A website accessibility checker scans code and design for detectable barriers.

    What Checkers Find

    Automated Reviews

    These tools inspect HTML, CSS, ARIA attributes, page structure, and visual styles. They can detect missing alternative text, empty buttons, unlabeled fields, incorrect headings, duplicate IDs, low contrast, and selected keyboard issues.

    Visual Reports

    Many checkers place icons or overlays directly on the tested page. Reviewers can quickly connect each warning to a button, image, heading, link, or form field.

    Do not treat the overall score as a simple pass or fail. Inspect every error, warning, and review item because some results require human judgment.

    Top Testing Tools

    WAVE

    WAVE lets users enter a public URL and see visual accessibility feedback on the page. It highlights errors, alerts, structural elements, contrast concerns, and ARIA information.

    axe DevTools

    axe DevTools is a browser extension for deeper technical inspection. It identifies rule violations, highlights affected code, and offers guidance for correcting common failures.

    Accessibility Insights

    Microsoft Accessibility Insights combines automated checks with guided manual testing. Its FastPass feature catches common failures, while tab-stop testing helps reviewers examine keyboard focus order and visibility.

    accessScan

    accessScan provides a quick accessibility snapshot mapped to current WCAG criteria. It can reveal broad patterns and help teams decide which pages need deeper investigation.

    AudioEye

    The AudioEye Accessibility Checker reviews common accessibility and ADA-related metrics. It can quickly expose technical barriers and provide an overview of page issues.

    How to Test Website Accessibility

    This practical sequence combines fast scanning with meaningful human review.

    How to Test Website Accessibility

    Choose Key Pages

    Start with the homepage, popular landing pages, contact forms, login screens, checkout flows, search results, and one example of every template. Include pages containing videos, pop-ups, tables, sliders, filters, or custom widgets.

    Run Automated Scans

    Scan each selected page with WAVE, axe DevTools, Accessibility Insights, or another trusted checker. Review every warning, locate the affected element, and inspect the code before making changes.

    Test open menus, validation errors, modal windows, filters, and expanded accordions because dynamic states can contain problems hidden during initial loading.

    Test the Keyboard

    Put the mouse aside and move through the page with Tab and Shift plus Tab. Every interactive element should receive visible focus in a logical sequence.

    Use Enter or Space to activate controls and Escape to close dialogs. Confirm that focus never becomes trapped and that skip-navigation links work.

    Use a Screen Reader

    Test with NVDA on Windows, VoiceOver on Apple devices, or TalkBack on Android. Navigate through headings, links, buttons, landmarks, and form controls.

    Listen for meaningful labels, logical heading levels, useful image descriptions, and understandable errors. Controls should announce their purpose, role, and current state.

    Check Zoom and Forms

    Increase browser zoom to 200 percent and 400 percent. Text, menus, forms, and buttons should remain readable without overlapping, disappearing, or requiring unnecessary horizontal scrolling.

    Every form field needs a visible label. Error messages should identify the problem, explain the correction, and connect to the affected input.

    Review Media and Mobile

    Videos need accurate captions, while important audio needs a transcript or equivalent alternative. Animations should include pause controls and respect reduced-motion preferences when possible.

    Automated Scan Limits

    Partial Coverage

    Industry guidance often estimates that automated tools detect roughly 30 to 40 percent of potential barriers. They perform well with machine-readable problems such as missing attributes, invalid markup, and measurable contrast failures.

    They cannot reliably judge whether alternative text is useful, instructions are understandable, or a workflow feels confusing.

    Human Review

    Manual testing provides context. A checker may confirm that an image has alt text, but a person must decide whether that description communicates the image’s purpose.

    Task-based testing with screen reader users, keyboard users, magnification users, and people with cognitive disabilities can reveal barriers developers overlook.

    Legal Limits

    Passing an automated scan does not guarantee compliance with the ADA, European Accessibility Act, or other laws. Standards and legal duties may vary by organization and location.

    Treat scans as evidence within a wider accessibility program, not as legal certification.

    Fix and Retest

    Clear documentation turns test findings into useful development tasks.

    Fix and Retest

    Report Clearly

    Record the page URL, affected element, browser, device, assistive technology, WCAG criterion, reproduction steps, expected result, and actual result. Add screenshots or recordings where helpful.

    Prioritize barriers that block navigation, registration, purchasing, payment, account access, or support.

    Repair Root Causes

    Fix shared components before isolated pages. Prefer native HTML because it includes valuable keyboard and assistive-technology behavior.

    Use ARIA only when native elements cannot communicate the necessary role, name, state, or relationship.

    Test Again

    Repeat the original test after every repair. Run the scanner again, use the keyboard, and check the component with a screen reader. Keep the issue open until the fix works across required browsers, devices, and assistive technologies.

    Also Read: How to convert Javascript to Typescript?

    Frequently Asked Questions

    1. Can Accessibility Testing Be Free?

    Yes. WAVE, Lighthouse, axe DevTools, NVDA, VoiceOver, and Accessibility Insights offer free testing options, although complete reviews still need manual checks, context, and real-user feedback.

    2. Is Lighthouse Enough?

    No. Lighthouse catches selected technical failures, but it cannot fully assess meaningful alt text, screen reader flow, keyboard usability, understandable instructions, or complex customer journeys.

    3. How Often Should Testing Happen?

    Test during design and development, before major releases, after platform or plugin changes, and whenever important templates, components, content, or user journeys are updated.

    4. Which Standard Should I Follow?

    WCAG 2.2 is the leading international accessibility standard. Many organizations target Level AA, although specific legal, contractual, regional, and industry requirements may differ.

    Make Every Click Count

    Knowing how to test website accessibility gives web teams a repeatable process for building better digital experiences. Start with automated tools, then add keyboard checks, screen readers, zoom, forms, mobile testing, and real-user feedback. Document barriers clearly, repair shared components, and retest every change. Accessibility is not a final checkbox. It is an essential part of responsible, useful, user-focused web development.

  • How to Fix Mixed Content Warnings Without Breaking Sites

    How to Fix Mixed Content Warnings Without Breaking Sites

    Your SSL certificate may be valid while your website still appears insecure. The usual cause is one forgotten image, script, font, stylesheet, iframe, or API request loading through HTTP.

    When I troubleshoot this issue, I do not begin by adding another redirect. I first identify the exact insecure request, confirm that an HTTPS version exists, and repair the URL at its source. That approach is the safest way to learn how to fix mixed content warnings without hiding the real problem.

    What Causes Mixed Content Warnings?

    Mixed content occurs when the main webpage loads over HTTPS but requests another resource through an insecure protocol, usually HTTP. That resource may be visible in the HTML, generated by a plugin, stored in a database, or inserted by JavaScript.

    Browsers treat insecure resources differently. Some images or media files may be automatically upgraded to HTTPS. More dangerous resources, including scripts and iframes, may be blocked because they can alter the page or expose visitor data.

    A browser upgrade does not mean the underlying problem is fixed. The original HTTP URL may still exist in your code, database, cache, or third-party integration.

    Quick Mixed Content Repair Guide

    Warning source Where to check Best permanent fix
    Image or video HTML, CSS, media library Replace HTTP URL with HTTPS or a relative path
    CSS or JavaScript Theme, plugin, template, bundle Update the source file and rebuild cached assets
    WordPress content Posts, widgets, options, page-builder data Back up, run a controlled database replacement, then clear caches
    External widget Embed code or tag manager Use the provider’s HTTPS URL or replace the provider
    CDN asset CDN settings and cached HTML Correct the origin URL, enable HTTPS, and purge the CDN
    API or iframe Application code Move the endpoint to HTTPS or remove the integration

    How to Find Every Insecure Resource

    How to Find Every Insecure Resource

    Check the Browser Console

    Open the affected page in Chrome, Edge, or Firefox. Press F12, select Console, and reload the page.

    Mixed content messages normally show the secure page URL and the insecure resource URL. Copy each HTTP address into a working list. Do not repair only the first warning because one page may contain several insecure requests.

    I also test more than the homepage. Product pages, blog posts, checkout screens, forms, landing pages, and account areas often load different templates and scripts.

    Inspect the Network and Security Panels

    Open the Network panel, reload the page, and filter requests by http://. Check whether the browser upgraded, redirected, or blocked each request.

    The Security panel can also reveal certificate and resource problems. Chrome DevTools provides network and security inspection features that help trace how individual assets load.

    Search the Website Source and Database

    View the rendered page source and search for http://. Then inspect the theme, templates, CSS files, JavaScript files, tag manager, widgets, and database.

    This step matters because browser warnings show the failed resource, not always the system that created it. An HTTP image could come from a page builder, a CSS background rule, a cached plugin file, or structured data.

    How to Fix Mixed Content Warnings Step by Step

    How to Fix Mixed Content Warnings Step by Step

    Confirm the HTTP Resource Supports HTTPS

    Before replacing a URL, open its HTTPS version directly.

    For example, change:

    http://cdn.example.com/image.jpg

    to:

    https://cdn.example.com/image.jpg

    If the HTTPS file loads correctly, update the source reference. If it fails, find another secure host or serve the file from your own HTTPS-enabled domain.

    Blindly changing every string from HTTP to HTTPS can break old APIs, abandoned widgets, or external files that never supported encryption.

    Repair Hardcoded URLs

    Search your HTML, templates, CSS, and JavaScript for insecure absolute paths.

    Replace:

    http://example.com/assets/logo.png

    with:

    https://example.com/assets/logo.png

    For assets hosted on the same website, I usually prefer a root-relative path:

    /assets/logo.png

    Relative paths reduce the risk of future protocol mismatches. I avoid protocol-relative URLs such as //example.com/file.js in modern projects because explicit HTTPS is clearer and safer.

    After changing source files, rebuild compiled CSS or JavaScript bundles when required.

    Fix Mixed Content in WordPress

    WordPress migrations often leave old HTTP addresses inside posts, media records, widgets, page-builder content, custom fields, and plugin options.

    First, open Settings > General. Confirm that both the WordPress Address and Site Address begin with https://.

    Next, back up the database. Use a trusted search-and-replace tool to replace the exact old domain:

    http://example.com

    with:

    https://example.com

    Run a dry test first. Do not perform a broad replacement of every http:// string because external links may not support HTTPS.

    WordPress also lists plugins that can address insecure content, but I treat them as diagnostic or transitional tools. A source-level database or code correction remains easier to maintain.

    Once HTTPS is stable, strengthen session handling and browser protections by configuring secure cookie settings.

    Replace Insecure Third-Party Resources

    External chat tools, advertising scripts, maps, fonts, video players, analytics tags, and embedded forms can trigger mixed content.

    Check the provider’s current documentation for an HTTPS embed. If none exists, remove the resource, self-host it when licensing permits, or choose another provider.

    Do not download and host third-party scripts without checking permissions and update requirements. Self-hosting an outdated security-sensitive script may create a larger risk than the original warning.

    Correct CDN and Server Settings

    A server redirect moves page requests from HTTP to HTTPS, but it does not automatically repair every HTTP URL embedded within the page.

    Cloudflare states that forcing HTTPS alone does not resolve all mixed content. The page must still use HTTPS or suitable relative resource links.

    Cloudflare’s Automatic HTTPS Rewrites feature can rewrite eligible HTTP resources when secure versions exist. It can help with CMS content and assets outside your direct control. However, it should support a permanent repair, not replace one.

    After changing CDN or server rules, purge the CDN cache, application cache, page cache, and browser cache.

    Use Content Security Policy Carefully

    Use Content Security Policy Carefully

    A Content Security Policy can upgrade insecure requests with this directive:

    Content-Security-Policy: upgrade-insecure-requests

    This instructs supporting browsers to request HTTP resources through HTTPS. It can be useful during a controlled migration, but it does not make an unavailable HTTPS resource work.

    I deploy the header in report-only or staging conditions first. Then I check scripts, fonts, APIs, images, and iframes for failures.

    Do not rely on the deprecated block-all-mixed-content directive as a modern primary strategy. MDN documents upgrade-insecure-requests as the relevant upgrade mechanism and notes that older mixed-content directives have changed or been deprecated.

    How to Verify the Repair

    When testing how to fix mixed content warnings, I use a five-layer verification process:

    1. Clear the website, plugin, server, and CDN caches.
    2. Open the page in a private browser window.
    3. Check the Console for mixed content messages.
    4. Filter the Network panel for http://.
    5. test several page templates, forms, embeds, and mobile layouts.

    My useful rule is simple: a padlock is evidence, not the entire test. A page can display a secure icon while an automatically upgraded image still hides an outdated HTTP reference.

    Worked Diagnostic Example

    I once traced a warning to a background image that did not appear in the HTML. The console identified an HTTP image, but searching the page editor found nothing.

    The URL was stored inside a generated CSS file created by a page builder. I updated the original design setting, regenerated the CSS, cleared the page cache, and purged the CDN. Editing the generated file alone would have failed because the builder recreated it during the next update.

    That is why I trace each warning back to its generating source.

    Common Mixed Content Fixes That Fail

    Installing an SSL certificate does not update embedded URLs.

    Adding a 301 redirect may secure page navigation, but browsers can still block insecure subresources before a redirect solves the request.

    A plugin may rewrite visible output while leaving old database values untouched.

    Automatic HTTPS upgrades may conceal stale references that later fail in another browser, integration, or security policy.

    Replacing every http:// string without testing can break external APIs and downloadable resources.

    Frequently Asked Questions

    1. Why does mixed content remain after installing SSL?

    SSL secures the main connection, but old HTTP resource URLs may still remain in your code, database, plugins, CSS, or external embeds.

    2. Can a redirect fix mixed content warnings?

    A redirect helps move visitors to HTTPS, but you must still update embedded images, scripts, stylesheets, iframes, APIs, and fonts.

    3. How do I fix mixed content in WordPress?

    Update both site URLs, back up the database, replace old domain-specific HTTP paths, regenerate builder files, and clear every cache layer.

    4. Does mixed content affect website security?

    Yes. Insecure resources may be intercepted or modified, while browsers may block scripts and other active content to protect visitors.

    Padlock Restored, Crisis Cancelled

    The best answer to how to fix mixed content warnings is not another cosmetic patch. Find the insecure request, identify where it was generated, confirm HTTPS support, and repair the original reference.

    Start with the browser console. Fix one resource category at a time, clear every cache, and retest the page in a private window. Once the console stays clean across your key templates, your HTTPS migration is finally complete.

  • Coding Career Mistakes Beginners Make When Building Their Skills

    Coding Career Mistakes Beginners Make When Building Their Skills

    I remember thinking that learning to code meant collecting as many programming languages and frameworks as possible. Every new tutorial looked like the missing piece, so I kept jumping between topics. Instead of feeling more confident, I found myself forgetting what I had learned just a few weeks earlier.

    I also noticed that my biggest breakthroughs never came from watching another course. They happened when I struggled through bugs, built small projects, and accepted that feeling stuck was part of learning. Looking back, most beginner mistakes weren’t about intelligence. They were about approaching the learning process the wrong way.

    Why Most Beginners Struggle More Than They Need To

    Why Most Beginners Struggle More Than They Need To

    Starting a coding career can feel overwhelming because there’s always another language, framework, or trend to explore. Social media and online communities make it seem like successful developers know everything, but that’s rarely true.

    The strongest programmers usually have a solid foundation rather than a long list of technologies. They understand how to solve problems, debug issues, and keep learning as the industry evolves. Beginners who focus on these skills often progress faster than those chasing every new trend.

    Trying to Learn Everything at Once

    One of the biggest coding career mistakes beginners make is believing they should master multiple programming languages at the same time.

    Learning Python today, JavaScript tomorrow, and Rust next week spreads your attention too thin. Each language has its own syntax, ecosystem, and best practices. Constantly switching makes it harder to develop confidence in any of them.

    Instead, choose one language that matches your goals. If you’re interested in web development, JavaScript is a practical starting point. If data analysis or automation interests you, Python is an excellent option. Build a strong foundation before expanding your skill set.

    Depth almost always creates better career opportunities than constantly starting over.

    Watching Tutorials Without Building Anything

    Watching Tutorials Without Building Anything

    Tutorials are valuable, but they shouldn’t become your primary learning method.

    Many beginners spend months following step-by-step videos without creating anything independently. This habit, often called tutorial hell, creates the illusion of progress while limiting real problem-solving experience.

    After finishing a lesson, close the video and build something similar on your own. It doesn’t have to be impressive. A calculator, weather app, expense tracker, or simple to-do list teaches far more than replaying another course.

    Another common challenge appears when beginners open a blank editor and have no idea where to begin. That uncertainty is completely normal. The solution isn’t another tutorial. It’s breaking the project into smaller pieces and writing one function at a time.

    Every independent project improves confidence because it forces you to think instead of copy.

    Memorizing Code Instead of Learning How to Solve Problems

    Programming isn’t a memory competition.

    Experienced developers regularly use documentation, search official references, and review existing code. They don’t memorize every function or syntax rule because they don’t need to.

    Focus on understanding why code works rather than remembering every character. Learn how variables interact, how loops behave, and how functions solve specific problems.

    When you understand the logic, finding the correct syntax becomes much easier.

    Reading documentation is another skill worth developing early. Official documentation often explains features more accurately than random online examples and helps you become a more independent developer.

    Skipping the Fundamentals

    Skipping the Fundamentals

    Advanced topics like artificial intelligence, cloud computing, and cybersecurity are exciting, but rushing toward them too early creates unnecessary gaps.

    Programming fundamentals remain the backbone of software development. Variables, functions, object-oriented programming, debugging, data structures, algorithms, and version control appear in almost every development role.

    Ignoring these concepts usually makes advanced technologies feel much harder than they should.

    Git and GitHub deserve special attention as well. Learning version control early helps you manage projects, track changes, and collaborate with other developers, all of which are expected in professional environments.

    Treat Errors Like Helpful Feedback

    Few things frustrate beginners more than seeing red error messages fill the screen.

    It’s easy to think an error means failure, but experienced developers see it differently. Every error contains information that points toward the next step.

    Instead of immediately searching for the exact solution, read the message carefully. Check line numbers, variable names, and function calls before making changes.

    Developing debugging skills saves countless hours throughout a coding career because finding problems efficiently is just as valuable as writing new features.

    Don’t Learn Alone

    Don't Learn Alone

    Learning independently doesn’t mean learning in isolation.

    Developer communities, coding groups, and peer discussions expose you to different ways of thinking. Asking thoughtful questions often leads to faster progress than struggling with the same issue for days.

    Sharing projects also builds confidence. Feedback helps you improve your code while preparing you for real-world code reviews and team collaboration.

    At the same time, remember that career growth isn’t only technical. Communication, curiosity, and consistency matter just as much. That’s why continuous learning for programmers becomes a long-term habit instead of a short-term goal. Every project teaches something new, regardless of experience level.

    Build Habits Instead of Chasing Perfection

    Successful developers rarely become successful because they studied longer than everyone else.

    They become successful because they build consistently. Writing code several times a week, reviewing past projects, fixing bugs, and gradually increasing project complexity creates steady improvement.

    Small, repeatable habits outperform occasional bursts of motivation. A simple project completed today contributes more to your growth than another week spent planning the perfect learning roadmap.

    FAQs: Coding Career Mistakes Beginners Make When Building Their Skills

    1. Should I learn multiple programming languages as a beginner?

    It’s usually better to focus on one language until you’re comfortable building projects. A strong foundation makes learning additional languages much easier.

    2. How do I escape tutorial hell?

    Start creating small projects without following every step of a video. Building independently strengthens problem-solving skills and reveals what you truly understand.

    3. Is memorizing syntax necessary?

    No. Understanding programming concepts and knowing how to use documentation are far more valuable than memorizing every command.

    4. How important are Git and GitHub for beginners?

    They’re essential. Version control is widely used in professional software development and helps you manage code while showcasing projects to employers.

    Why Daily Practice Shapes a Better Developer

    Every programmer makes mistakes, especially in the beginning. What separates successful developers isn’t avoiding every mistake but recognizing them early and adjusting their approach. Building projects, strengthening fundamentals, embracing debugging, and staying consistent create skills that last far beyond the latest programming trend.

    A coding career grows one solved problem at a time. Keep building, keep learning, and let steady progress do the heavy lifting.

  • How to Structure Large Python Projects Properly Without Creating a Mess

    How to Structure Large Python Projects Properly Without Creating a Mess

    I noticed something interesting after working on a few Python projects over the years. The code usually looked clean during the first week, but once new features started piling up, finding the right file became harder than writing the actual functionality. The project wasn’t failing because Python was difficult. It was failing because the structure couldn’t keep up with its growth.

    I also found that reorganizing a messy project takes far more time than organizing it correctly from the beginning. A few thoughtful decisions about folders, imports, and configuration make development smoother, especially when multiple people contribute to the same codebase.

    Why Project Structure Matters More Than Most Developers Think

    Why Project Structure Matters More Than Most Developers Think

    Every Python project starts small. A single file grows into a handful of modules, then suddenly you have dozens of packages, hundreds of functions, and several developers working simultaneously. Without a clear structure, hidden dependencies, duplicate code, and circular imports become increasingly common.

    A well-structured project isn’t about making folders look organized. It creates predictable patterns that help developers understand where code belongs, how components communicate, and where new features should be added. It also improves maintainability, testing, onboarding, and long-term scalability.

    The goal isn’t to build the most complex architecture possible. It’s to build one that continues making sense six months from now.

    Start With the Right Directory Layout

    One of the biggest improvements modern Python developers can make is adopting the src/ layout. Instead of placing application code directly in the project root, keep it inside a dedicated source directory.

    A typical production-ready layout looks like this:

    my_large_project/

    ├── .gitignore

    ├── README.md

    ├── pyproject.toml

    ├── secrets.env

    ├── src/

    │   └── my_project/

    │       ├── __init__.py

    │       ├── main.py

    │       ├── config/

    │       ├── core/

    │       ├── services/

    │       └── api/

    ├── tests/

    └── scripts/

    This approach prevents accidental local imports that often hide packaging issues during development. Instead, developers install the package using editable mode (pip install -e .), making local behavior much closer to production.

    Separating source code from configuration files, scripts, and documentation also keeps the repository easier to navigate as it grows.

    Organize Code by Responsibility Instead of File Type

    Organize Code by Responsibility Instead of File Type

    One mistake many developers make is grouping files by generic names like utils.py, helpers.py, or models.py. These files often become dumping grounds for unrelated logic.

    Instead, organize your project around responsibilities.

    For example:

    • api/ handles HTTP routes or CLI commands.
    • core/ contains business rules and domain logic.
    • services/ manages database operations and external APIs.
    • config/ loads settings and environment variables.

    Each directory has a clear purpose, making the codebase easier to understand.

    For exceptionally large applications, organizing by feature can be even more effective. Directories such as billing/, authentication/, or reporting/ allow every feature to own its models, services, and business logic while reducing unnecessary dependencies between modules.

    Stop Letting utils.py Grow Forever

    Almost every long-running Python project eventually develops a massive utils.py file filled with unrelated helper functions.

    While it may seem convenient initially, this file becomes increasingly difficult to maintain. Developers often add new functions simply because they don’t know where else they belong.

    A better approach is giving helper modules descriptive names.

    Date formatting functions belong in something like date_utils.py. Validation logic fits naturally inside an api/validators.py module. File processing utilities deserve their own dedicated module.

    Clear names communicate intent immediately and encourage better project organization.

    Keep Configuration Separate From Business Logic

    Keep Configuration Separate From Business Logic

    Configuration should never be mixed directly into application code.

    Database credentials, API keys, file paths, and feature flags belong inside a dedicated configuration module rather than scattered throughout multiple files.

    Loading environment variables through tools such as Pydantic Settings or python-dotenv keeps sensitive information outside your repository while making deployments significantly easier.

    An application should also fail immediately if required configuration values are missing. Discovering configuration problems during startup is much better than finding them halfway through a production request.

    Standardize Everything With pyproject.toml

    Modern Python development has largely moved toward using pyproject.toml as the central configuration file.

    Instead of maintaining separate files for packaging, linting, formatting, and testing, everything can live in one place.

    A simplified example looks like this:

    [project]

    name = “my_large_project”

    version = “0.1.0”

    dependencies = [

        “pydantic>=2.0”,

        “python-dotenv>=1.0”

    ]

    [tool.ruff]

    line-length = 88

    [tool.pytest.ini_options]

    pythonpath = [“src”]

    testpaths = [“tests”]

    Using a single configuration file reduces maintenance overhead and makes project setup much easier for new contributors.

    Prevent Circular Imports Before They Happen

    Prevent Circular Imports Before They Happen

    Circular imports are usually symptoms of architectural problems rather than Python limitations.

    They occur when two modules depend on each other directly, preventing the interpreter from resolving imports correctly.

    Using absolute imports improves readability while making dependencies much easier to follow.

    Instead of importing shared objects globally, inject dependencies where they’re needed. For example, pass a database connection into a service instead of importing a global database object from another module.

    This approach creates looser coupling, simplifies testing, and reduces unexpected side effects throughout the application.

    Automate Code Quality From the Beginning

    A clean structure won’t stay clean without consistent standards.

    Automated tooling helps teams catch problems before code reaches the main branch.

    Some valuable tools include:

    • Ruff for linting and formatting
    • Pytest for automated testing
    • MyPy for static type checking
    • Git hooks or CI/CD pipelines for automated quality checks

    Running commands such as ruff check ., ruff format ., and mypy src/ during development catches many common issues before they become production bugs.

    Automation removes subjective code reviews and allows developers to focus on architecture and functionality instead of formatting discussions.

    Know When Your Project Needs Refactoring

    Know When Your Project Needs Refactoring

    No project structure remains perfect forever.

    If developers regularly struggle to locate files, modules import each other unexpectedly, or every new feature requires editing half a dozen unrelated files, it’s probably time to reorganize.

    Refactoring doesn’t always require rewriting the application. Often, moving responsibilities into better-defined modules and simplifying dependencies dramatically improves maintainability.

    The best project structures evolve alongside the software instead of trying to predict every future requirement on day one.

    FAQs: How to Structure Large Python Projects Properly Without Creating a Mess

    1. Why is the src/ layout recommended for Python projects?

    It prevents accidental local imports and ensures your package behaves consistently during development and production.

    2. Should every Python project use the same folder structure?

    No. Smaller projects can stay simple, while larger applications benefit from dedicated layers or feature-based organization.

    3. Is pyproject.toml better than multiple configuration files?

    Yes. It centralizes project metadata, dependencies, testing, formatting, and linting, making maintenance much easier.

    4. How can I avoid circular imports?

    Use absolute imports, separate responsibilities clearly, and inject dependencies instead of relying on global objects shared across modules.

    Why Good Architecture Keeps Paying You Back

    Well-structured Python projects aren’t just easier to read. They’re easier to test, debug, expand, and hand over to another developer. Every thoughtful decision you make early reduces technical debt later, allowing the project to grow without becoming frustrating to maintain.

    Clean architecture isn’t about adding more folders. It’s about making every file feel like the obvious place for the code it contains.

  • How to Convert JavaScript to TypeScript Without Breaking Your App

    How to Convert JavaScript to TypeScript Without Breaking Your App

    A JavaScript project can feel perfectly fine until one small change creates errors across files you thought were unrelated. That is usually the moment I start wanting stronger guardrails. Learning how to convert javascript to typescript gives developers those guardrails while keeping the JavaScript code they already worked hard to build.

    TypeScript is a superset of JavaScript, so migration does not mean rebuilding an entire website from scratch. Existing JavaScript can remain in the project while TypeScript is introduced gradually. That makes the transition much more practical for web applications, React projects, Node.js backends, APIs, dashboards, and growing production codebases.

    Key Takeaways

    • Move gradually instead of rewriting everything.
    • Let JavaScript and TypeScript coexist.
    • Convert simple files first.
    • Fix meaningful type errors instead of hiding them.
    • Enable strict checking after the codebase becomes stable.

    Why This Upgrade Is Worth The Trouble

    Understanding how to convert javascript to typescript becomes important once a web project starts growing faster than your ability to remember every function, object, and dependency.

    JavaScript is flexible, which is great until that flexibility turns into mystery values, undefined properties, or functions receiving the wrong data. TypeScript adds compile-time checks, better editor suggestions, clearer function contracts, and safer refactoring. Think of it as giving your JavaScript project a spell-checker that understands code instead of words.

    Prepare The Project First

    A successful migration starts before any .js file becomes .ts. The goal is to create a safe working environment where problems can be isolated quickly.

    Save A Stable Version

    Commit the current project to Git and make sure the existing application builds correctly. Run available unit tests, integration tests, and important browser flows before changing configuration.

    This gives you a clean baseline. Small migration commits are much easier to review and reverse than a giant commit that changes hundreds of files at once.

    Pick An Easy Starting Point

    Start with utility functions, formatters, validation helpers, or small modules with few dependencies. These files usually expose fewer migration problems and help you understand TypeScript errors without overwhelming the project.

    Leave complicated entry files, authentication systems, or highly connected modules until the migration process feels familiar.

    Install TypeScript Dependencies

    The first technical step is adding TypeScript to the project so the compiler can understand .ts and .tsx files.

    Install TypeScript Dependencies

    Add The Compiler

    For an npm project, install TypeScript as a development dependency:

    npm install –save-dev typescript @types/node

    The @types/node package provides TypeScript definitions for Node.js APIs. Browser-only projects may not need it, while Node.js applications and many development tools commonly do.

    You can confirm the latest TypeScript setup guidance through the official TypeScript documentation and the Node.js TypeScript introduction.

    Create The Config File

    Generate the TypeScript configuration with:

    npx tsc –init

    This creates tsconfig.json, which controls type checking, compilation targets, module behavior, included files, and other project-wide TypeScript settings.

    Start With A Flexible TSConfig

    An existing JavaScript application should normally begin with a permissive configuration. Trying to enforce every strict rule immediately can produce hundreds of errors before the first file is properly migrated.

    Allow Both File Types

    A practical transitional configuration can look like this:

    {

      “compilerOptions”: {

        “target”: “ES2022”,

        “module”: “commonjs”,

        “allowJs”: true,

        “checkJs”: false,

        “strict”: false,

        “outDir”: “./dist”,

        “rootDir”: “./src”,

        “esModuleInterop”: true,

        “skipLibCheck”: true

      },

      “include”: [“src/**/*”]

    }

    allowJs lets JavaScript stay beside TypeScript. Keeping strict disabled temporarily can make the initial migration easier, although the final goal should be stronger checking.

    Match Your Real Environment

    Do not copy configuration blindly. React, Next.js, Node.js, Vite, Webpack, CommonJS, and ECMAScript modules may require different settings.

    Use the official TSConfig reference to confirm what each compiler option actually does before changing production configuration.

    Update The Build Process

    Once TypeScript is installed, your application needs a reliable way to compile or type-check the new files.

    Add Build Commands

    A basic Node.js project might include:

    “scripts”: {

      “build”: “tsc”,

      “start”: “node dist/index.js”

    }

    Running npm run build then executes the TypeScript compiler and creates JavaScript output in the configured directory.

    Framework projects may already handle TypeScript through their own build tools. In that case, follow the framework’s recommended workflow instead of forcing an unnecessary standalone compilation process.

    Test The Pipeline Early

    Run the development server, production build, linter, and tests after configuration changes. Do not wait until every file has been converted.

    Testing early helps reveal module-resolution problems, incorrect paths, CI issues, and runtime assumptions while each change is still small.

    Add Missing Library Types

    Third-party packages are one of the most common sources of confusion during JavaScript-to-TypeScript migration.

    Check Built-In Types First

    Many modern packages already ship their own TypeScript declarations. If they do, no additional type package is necessary.

    Older JavaScript libraries may depend on definitions from the community-maintained DefinitelyTyped project.

    For example:

    npm install –save-dev @types/express @types/lodash

    Install these definitions only when the package actually requires them. Adding unnecessary @types packages can create conflicts or duplicate declarations.

    Handle Untyped Packages Carefully

    Some libraries provide no TypeScript definitions at all. A local .d.ts declaration file can temporarily describe such a module to the compiler.

    Treat loose declarations as migration bridges rather than permanent shortcuts. Improve them gradually as you learn the package’s real API and data structures.

    Convert Files One At A Time

    The safest answer to how to convert javascript to typescript is not “rename everything.” Incremental migration keeps the application usable while each part becomes typed.

    Convert Files One At A Time

    Rename JavaScript Files

    Change standard JavaScript files from .js to .ts. In React applications, files containing JSX normally change from .jsx to .tsx.

    Do not change business logic at the same time unless necessary. Separating type migration from feature changes makes bugs easier to diagnose.

    Follow Dependencies Gradually

    After converting a small utility or model, move toward files that depend on it. This creates a natural migration path through the project.

    Large teams can also divide the migration by feature, folder, service, or component instead of attempting one enormous codebase-wide change.

    Fix Types And Add Annotations

    Renaming a file only exposes TypeScript to the code. The real benefit comes from describing what values functions and objects are supposed to accept.

    Type Important Functions

    JavaScript might contain:

    function calculateTotal(price, tax) {

      return price + (price * tax);

    }

    The TypeScript version can make expectations clear:

    function calculateTotal(

      price: number,

      tax: number

    ): number {

      return price + (price * tax);

    }

    Now passing an unexpected string can be flagged before that mistake reaches users.

    Model Data Clearly

    Use interfaces, type aliases, unions, and optional properties to describe important application data. These are especially useful for API responses, form models, React props, user records, and application state.

    Avoid filling the codebase with any just to silence errors. TypeScript’s unknown type is often safer for data that has not yet been validated because it forces you to inspect the value before using it.

    Tighten Strict Mode

    Once most JavaScript files have been migrated and major compiler issues are resolved, strengthen the project configuration.

    Turn On Stronger Checks

    A mature migration can move toward:

    {

      “compilerOptions”: {

        “allowJs”: false,

        “strict”: true

      }

    }

    Strict mode catches more unsafe assumptions involving null values, function parameters, property access, and implicit types.

    The official JavaScript migration guide recommends gradually increasing TypeScript’s checking rather than letting migration complexity stop progress.

    Treat Errors As Useful Clues

    Compiler errors often reveal assumptions that JavaScript allowed to remain undocumented. A value assumed to always exist may actually be optional. An API property assumed to be numeric may sometimes arrive as a string. Fixing those assumptions improves the application itself, not just its TypeScript score.

    Frequently Asked Questions

    1. What Is The Safest Way For How To Convert JavaScript To TypeScript?

    The safest approach is incremental migration. Enable JavaScript support, convert low-dependency files first, add meaningful types, test each change, and increase compiler strictness only after the application remains stable.

    2. Can JavaScript And TypeScript Run Together?

    Yes. TypeScript’s allowJs option lets .js and .ts files exist in the same project, making gradual migration practical for active applications that cannot pause development.

    3. Is Changing .js To .ts Enough?

    No. Renaming activates TypeScript checking, but developers still need to define important types, resolve compiler errors, review dependencies, test runtime behavior, and eventually strengthen compiler rules.

    4. Should I Use An Automatic JavaScript To TypeScript Converter?

    Converters can help with repetitive transformations, but generated types still require human review. Automated tools may understand syntax while missing business rules, API guarantees, nullable values, and application-specific relationships.

    From JavaScript Chaos To Typed Confidence

    Knowing how to convert javascript to typescript is really about improving a web project without disrupting what already works. Start with a stable JavaScript codebase, configure TypeScript for gradual adoption, migrate manageable files, describe important data clearly, and tighten strictness as confidence grows. The goal is not simply collecting .ts files. It is building code that developers can understand, change, test, and maintain with fewer surprises.

  • What Is Viewport Meta Tag? Master Responsive Web Design Easily

    What Is Viewport Meta Tag? Master Responsive Web Design Easily

    Many beginners feel excited after launching their first website, only to discover that it looks completely different on a smartphone. Tiny text, oversized layouts, and endless horizontal scrolling can quickly ruin the user experience. This is where understanding what is viewport meta tag becomes essential. 

    Although it’s just a single line of HTML code, it plays a crucial role in making web pages adapt to different screen sizes. In this guide, you’ll learn how the viewport meta tag works and why it’s the foundation of every responsive, mobile-friendly website. 

    Key Takeaways

    • Configures mobile screen dimensions by setting layout width to match device screen width.
    • Eliminates frustrating horizontal scrolling, tiny zoomed-out text, and broken mobile viewports.
    • Critical for Google mobile-first indexing, Core Web Vitals, and organic search engine rankings.
    • Protects web accessibility by allowing pinch-to-zoom capabilities for low-vision visitors.
    • Easy HTML snippet added straight into document header sections for instant responsiveness.

    Why Viewport Meta Tag Necessary for Web Developers

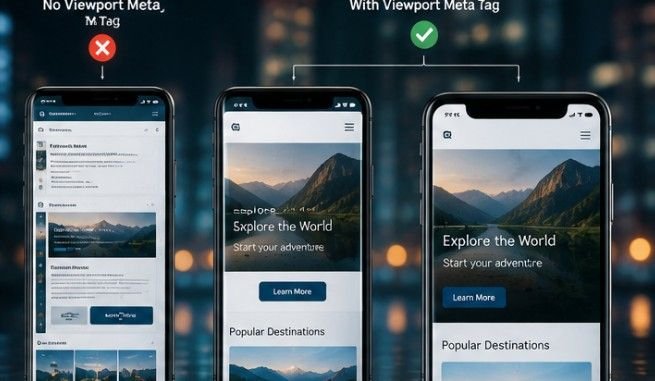
    Imagine trying to read a giant newspaper through a tiny keyhole without adjusting the page size. That chaotic mess is exactly what mobile browsers experience without explicit display directions. Learning what is viewport meta tag saves your visitors from squinting at desktop layouts squeezed onto pocket screens. It acts as the ultimate digital traffic cop for seamless mobile browsing.

    The Standard Code Snippet for Responsive Layouts

    Implementing mobile scaling takes just one clean line of HTML markup inside your document.

    Where to Place the HTML Code

    Every responsive webpage must include the viewport tag inside the document <head> section. Inserting <meta name=”viewport” content=”width=device-width, initial-scale=1.0″> ensures browsers read scaling rules immediately. Placing this code near your character set definition allows CSS stylesheets to calculate dimensions accurately.

    How Browsers Execute the Tag Instructions

    Mobile browsers read this metadata before drawing pixels on physical hardware displays. Skipping this header line forces browsers into legacy desktop fallback rendering modes. With the proper snippet active, content automatically reflows downward to fit exact device display sizes.

    Detailed Breakdown of Essential Viewport Attributes

    Configuring specific property attributes allows developers to customize browser rendering behaviors precisely across hardware.

    Detailed Breakdown of Essential Viewport Attributes

    Width and Initial Scale Instructions

    The width=device-width instruction matches page width to physical screen dimensions in device-independent pixels. The initial-scale=1.0 setting establishes a true one-to-one zoom level when pages load. Together, these core settings form the foundation of modern responsive web development.

    Zoom Control Properties and Accessibility Risks

    Attributes like user-scalable, maximum-scale, and minimum-scale regulate manual zooming permissions. Setting user-scalable=no prevents users from zooming, which violates critical WCAG accessibility guidelines. Always leave zoom controls unrestricted so low-vision readers can enlarge text effortlessly.

    Why Proper Mobile Viewport Scaling Matters Greatly

    Properly configured viewport tags unlock massive benefits across user engagement, performance metrics, and search engine visibility.

    Why Proper Mobile Viewport Scaling Matters Greatly

    Enabling Responsive Layouts and CSS Media Queries

    CSS media queries rely entirely on accurate device width readings to trigger layout breakpoints. Without viewport metadata, media queries report artificial desktop dimensions like 980 pixels instead of actual mobile screen sizes. Setting correct scale tags allows responsive stylesheets to apply fluid layouts across smartphones and tablets seamlessly.

    Enhancing Search Engine Rankings and Mobile Performance

    Search engines enforce mobile-first indexing, evaluating pages through mobile search crawlers first. Missing viewport tags flags websites as mobile-unfriendly, hurting organic ranking potential significantly. Proper scaling also stabilizes page rendering, reducing visual shifts and improving Core Web Vitals scores like Cumulative Layout Shift.

    Improving User Experience and Retention Rates

    Frustrated visitors abandon websites that force awkward horizontal scrolling or manual screen zooming. Clear, readable typography combined with touch-friendly navigation keeps users engaged longer. Delivering smooth mobile performance reduces bounce rates and converts casual visitors into loyal customers.

    How to Implement What Is Viewport Meta Tag in Code

    Setting up viewport metadata takes just a few quick steps in your text editor.

    How to Implement What Is Viewport Meta Tag in Code

    1. First, open your primary HTML document or header file inside your code editor. Locate the opening <head> tag at the top of your file structure.
    2. Second, paste <meta name=”viewport” content=”width=device-width, initial-scale=1.0″> directly below your character encoding tag. Ensure no extra syntax typos disrupt the HTML tag markup.
    3. Third, save your file and deploy changes to your local development preview server. Open browser developer tools, toggle device toolbar emulation, and test various mobile breakpoints. Confirm that horizontal scrollbars disappear and text remains perfectly legible across screens.

    Frequently Asked Questions

    1. What is viewport in meta tag?

    A viewport in a meta tag defines the visible screen area of a webpage, instructing mobile browsers how to scale page dimensions and text sizes correctly across various device screen widths.

    2. What happens if we don’t use a viewport meta tag?

    Without it, mobile browsers render pages using default desktop widths around 980 pixels, making text tiny, breaking responsive CSS layouts, and forcing annoying horizontal scrolling.

    3. What is the purpose of a meta tag?

    Meta tags supply structured metadata about HTML documents to browsers and search engine crawlers, defining character sets, page descriptions, indexing rules, and viewport scaling instructions.

    4. What is the primary purpose of the meta name viewport tag?

    The primary purpose of the meta name viewport tag is controlling page dimensions and initial zoom factors on mobile web browsers, establishing the core baseline for responsive web design.

    Conquer Mobile Layouts with Viewport Meta Tag 

    Understanding what is viewport meta tag is a simple yet essential step toward creating websites that perform well on every device. It ensures your pages display correctly on smartphones, tablets, and desktops, providing users with a smooth and consistent browsing experience. 

    Beyond improving responsiveness, it also supports better accessibility, user engagement, and mobile SEO. If your website doesn’t already include a viewport meta tag, now is the perfect time to add it and build a faster, more user-friendly, and fully responsive web experience. 

  • Client Side Versus Server Side Rendering: Which One Wins?

    Client Side Versus Server Side Rendering: Which One Wins?

    A website can feel instant, smooth, slow, or frustrating before a visitor knows why. Much of that experience begins with client side versus server side rendering, two ways of turning code into visible pages. Understanding them helps developers and website owners choose a setup that supports speed, search visibility, usability, and growth. That balance shapes every successful modern website.

    Key Takeaways

    • SSR creates HTML on the server, while CSR builds most visible content inside the browser with JavaScript.
    • SSR often improves initial content delivery and crawlability. CSR usually supports smoother interactions after loading.
    • Blogs and product pages commonly suit SSR. Dashboards and private applications often suit CSR.
    • Large scripts can slow CSR, while inefficient servers can slow SSR.
    • Modern websites frequently combine SSR, CSR, static generation, caching, and hydration.

    Server-Side Rendering Explained

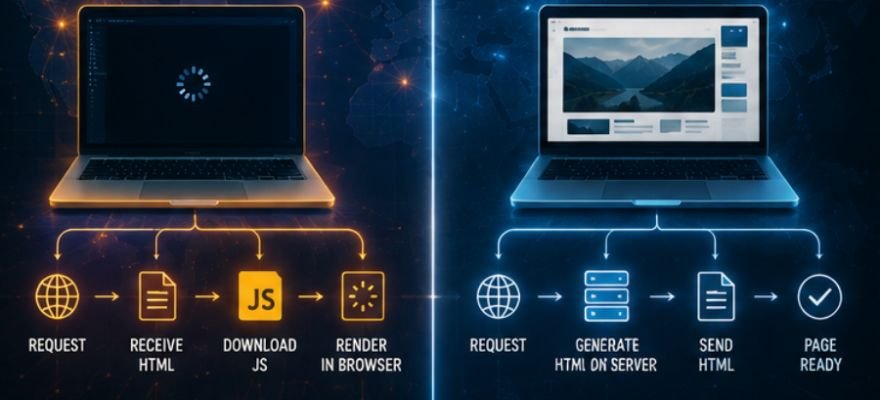
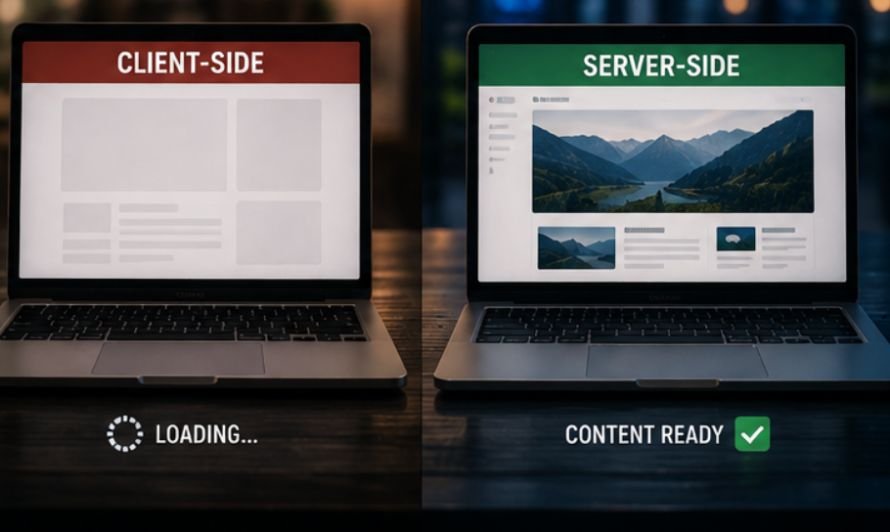
    Server-side rendering, or SSR, creates the main HTML on a web server before sending it to the visitor. The browser receives content that is mostly ready to display.

    How SSR Works

    A visitor requests a URL. The server gathers information from templates, databases, or APIs, combines it into complete HTML, and sends the response to the browser.

    The browser can display headings, paragraphs, products, and prices before every script finishes. JavaScript may arrive later to activate menus, forms, filters, and other controls.

    SSR Advantages

    SSR can improve initial visibility because meaningful HTML arrives in the first response. Search crawlers can inspect titles, headings, internal links, structured data, and body content without waiting for extensive JavaScript.

    SSR Limitations

    Generating pages for requests can increase server load, database activity, hosting costs, and maintenance. A slow query or overloaded server may delay Time to First Byte.

    SSR also does not guarantee immediate interaction. A page may look complete but remain inactive until JavaScript connects behavior through hydration.

    Best Uses For SSR

    Blogs, news sites, service pages, landing pages, property listings, and ecommerce product pages are strong SSR candidates. These pages depend on visible content and reliable search discovery.

    Client-Side Rendering Explained

    Client-Side Rendering Explained

    Client-side rendering, or CSR, sends a basic HTML shell and relies on JavaScript to build much of the visible page inside the browser.

    How CSR Works

    The browser downloads HTML, style files, and a JavaScript bundle. The script runs on the visitor’s device, requests information from an API, and inserts that data into the page.

    Understanding how to add JavaScript to HTML is especially useful when working with client-side rendering because the browser depends on correctly loaded scripts to build and update visible content. Proper script placement and loading strategies can also reduce rendering delays and prevent interactive features from breaking.

    After the first load, CSR can update individual sections quickly, creating smooth transitions that feel similar to installed software.

    CSR Advantages

    CSR supports live updates, instant filtering, drag-and-drop tools, and quick movement between application screens. Once scripts are available, many actions happen without full page reloads.

    CSR Limitations

    The first visit may feel slow because the browser must download, parse, and execute JavaScript before useful content appears. Large bundles, weak devices, poor connections, and delayed APIs make this worse.

    CSR can complicate SEO. Search engines process JavaScript, but blocked files, rendering errors, missing metadata, failed requests, or delayed links may hide important content.

    Best Uses For CSR

    Private dashboards, project tools, design platforms, inboxes, account portals, social feeds, and analytics applications often suit CSR. These experiences prioritize interaction over public search visibility.

    SSR And CSR Compared

    SSR And CSR Compared

    The better method depends on what must load first, how much interaction is required, and whether the page should rank in search.

    Speed And Web Vitals

    SSR may improve First Contentful Paint and Largest Contentful Paint by sending meaningful HTML quickly. Slow database work can still hurt server response time, while heavy hydration can delay Interaction to Next Paint.

    SEO And Accessibility

    SSR gives search engines content in the original response, making crawling, indexing, metadata extraction, and sharing previews more dependable.

    Cost And Scalability

    SSR can consume more server power, especially when requests require fresh database work. Caching, CDNs, and edge rendering can reduce that burden.

    The Hydration Problem

    Hydration connects JavaScript behavior to HTML already produced by the server. It makes buttons, navigation, forms, and interactive components work after the visible page arrives.

    A page may therefore look ready before it responds. Smaller scripts, code splitting, lazy loading, partial hydration, and careful prioritization can reduce this delay.

    Security On Both Sides

    Client-side code is visible through browser tools. Secret keys, database credentials, authorization rules, and sensitive calculations must remain on trusted servers.

    Authentication interfaces need the same careful treatment, so developers should understand how to secure website login forms against credential theft, automated attacks, insecure data transmission, and weak validation.

    Login protection should combine secure server-side processing with proper session handling and strict access controls.

    SSR also requires input validation, output escaping, session protection, access controls, encryption, and dependency updates. Rendering location changes architecture, not security responsibilities.

    How To Choose A Rendering Method

    How To Choose A Rendering Method

    Choosing client side versus server side rendering becomes easier when the decision follows the page’s purpose rather than a framework trend.

    Check Search Requirements

    First, decide whether the page must attract organic traffic. Articles, category pages, services, and product listings usually benefit from SSR, static generation, or another method that delivers readable HTML immediately.

    Review User Actions

    Next, examine what visitors do. A mostly readable page does not need a large JavaScript application. A workspace with live messages, charts, filters, or editing tools may benefit from CSR.

    Test Real Conditions

    Test on slower phones, restricted networks, and realistic hosting. Measure server response time, visual loading, JavaScript size, responsiveness, crawlability, and failed-request behavior.

    Hybrid Rendering Works Better

    Modern frameworks often combine methods. A website might server-render public pages, client-render private dashboards, and statically generate content that changes occasionally.

    This hybrid model gives each page suitable treatment. Streaming, edge rendering, server components, incremental regeneration, and selective hydration offer more control over speed, freshness, cost, and interactivity.

    Frequently Asked Questions

    1. What Is Better, Server-Side Rendering Or Client-Side Rendering?

    SSR is usually better for public, search-focused pages, while CSR often works better for interactive private applications. The right choice depends on content visibility, device performance, server capacity, and visitor behavior.

    2. Should I Use SSR Or CSR?

    Use SSR when fast visible content and reliable indexing matter. Choose CSR for dashboards and app-like interfaces. A hybrid approach is often more practical than applying one method everywhere.

    3. Is React SSR Or CSR?

    React supports both approaches. Basic React applications commonly use CSR, while frameworks such as Next.js provide SSR, static generation, server components, streaming, and mixed rendering strategies.

    4. Is Server-Side The Same As Client-Side?

    No. Server-side processing happens on remote infrastructure before content reaches visitors. Client-side processing happens inside the browser after scripts, files, and data have been downloaded.

    Render Smarter, Not Harder

    Choosing client side versus server side rendering should not become a battle between fashionable technologies. SSR strengthens content delivery and crawlability, while CSR enables responsive, application-like experiences. Strong web teams study each page, protect sensitive logic, test actual performance, and combine methods where useful. The best architecture feels effortless to visitors and manageable behind the scenes.

  • Engineering Mindset Development for Students and Early Career Professionals

    Engineering Mindset Development for Students and Early Career Professionals

    I started noticing something interesting while talking to engineering students and new graduates. The people who stood out weren’t always the ones with the highest grades or the longest list of programming languages. They approached problems differently. Instead of looking for the fastest answer, they were curious enough to ask why the problem existed in the first place.

    I also realized that developing an engineering mindset wasn’t something that happened after earning a degree. It grew through experience, small mistakes, and the willingness to keep improving. The more I observed successful engineers, the clearer it became that their greatest strength wasn’t memorizing formulas. It was learning how to think through challenges from multiple angles.

    What Engineering Mindset Development Really Means

    What Engineering Mindset Development Really Means

    Engineering mindset development goes beyond technical knowledge. It is the ability to approach problems with curiosity, logic, and a willingness to test ideas until a practical solution emerges. While technical skills remain essential, the mindset behind those skills often determines how effectively they are applied.

    A strong engineering mindset combines systematic thinking with creativity. Instead of jumping to conclusions, engineers define the problem, identify constraints, evaluate possible solutions, and refine their ideas based on evidence. This structured approach allows them to tackle everything from software bugs to infrastructure projects with confidence.

    Another important characteristic is systems thinking. Rarely does one decision affect only one component. Every choice can influence cost, performance, usability, sustainability, and long-term maintenance. Seeing those connections helps engineers make smarter decisions throughout a project’s lifecycle.

    Why Technical Knowledge Alone Isn’t Enough

    College courses provide the foundation, but real-world engineering introduces uncertainty that textbooks cannot fully prepare students for.

    Projects often involve limited budgets, changing requirements, unexpected technical challenges, and collaboration with people from different backgrounds. Success depends on adapting to these situations rather than simply recalling information.

    Employers increasingly value engineers who communicate clearly, ask thoughtful questions, and work effectively in teams. Someone who can explain complex technical concepts to non-technical stakeholders often becomes just as valuable as someone with exceptional coding or design skills.

    The ability to keep learning also matters. Technologies, programming languages, manufacturing methods, and industry standards continue evolving. Engineers who stay curious remain relevant throughout their careers instead of relying solely on what they learned in school.

    The Core Habits Behind Engineering Mindset Development

    The Core Habits Behind Engineering Mindset Development

    Building this mindset happens through repeated practice rather than one major breakthrough.

    Follow a Structured Design Process

    Every successful engineering project starts with understanding the problem before searching for solutions. Define the objective, identify constraints, brainstorm possibilities, build prototypes, evaluate results, and improve through multiple iterations.

    This process prevents wasted effort and encourages better decision-making throughout the project.

    Think in Systems Instead of Individual Parts

    Every component interacts with something else.

    A software feature affects user experience. A mechanical design influences manufacturing costs. A material choice impacts durability and sustainability.

    Looking at the bigger picture leads to solutions that perform well beyond their immediate purpose.

    Accept Constraints Instead of Fighting Them

    Engineering rarely happens under perfect conditions.

    Budgets, deadlines, regulations, available materials, and customer expectations all influence design decisions. Rather than viewing constraints as obstacles, experienced engineers treat them as design parameters that encourage smarter solutions.

    Learn by Building, Not Just Reading

    One of the fastest ways to strengthen engineering thinking is through hands-on experience.

    Joining robotics clubs, participating in design competitions, contributing to open-source software, or building personal hardware and software projects exposes students to challenges that classroom exercises cannot fully replicate.

    Working on real projects teaches lessons that are difficult to learn from lectures alone. Unexpected failures, changing requirements, debugging sessions, and teamwork all contribute to stronger problem-solving skills.

    Even small projects can create meaningful learning opportunities. Designing a simple mobile application, automating a repetitive task, building an Arduino project, or creating a personal website all require planning, testing, troubleshooting, and continuous improvement.

    The goal isn’t building something perfect. It’s learning how ideas evolve through experimentation.

    Treat Failure as Valuable Feedback

    Treat Failure as Valuable Feedback

    One of the biggest differences between experienced engineers and beginners is how they respond when something doesn’t work.

    Failed prototypes, unsuccessful experiments, and unexpected bugs are rarely signs of failure. Instead, they provide valuable information about what should change next.

    Every iteration improves understanding.

    Instead of asking, “Why did this fail?” effective engineers often ask, “What did this teach us?”

    This shift in perspective encourages resilience and reduces the fear of making mistakes. Over time, each setback becomes another opportunity to improve both technical skills and decision-making.

    Solve Problems That Have Real Context

    Abstract exercises help build technical foundations, but real-world challenges develop stronger engineering instincts.

    Projects connected to environmental sustainability, healthcare, accessibility, transportation, education, or business operations introduce practical constraints that require balancing multiple priorities.

    These experiences also strengthen communication skills because technical solutions must satisfy users, stakeholders, and project goals rather than simply meeting technical specifications.

    Working with real people often reveals challenges that cannot be predicted during initial planning.

    Reflect After Every Project

    Reflect After Every Project

    Finishing a project should never mark the end of the learning process.

    Take time to evaluate what worked well, what slowed progress, and what could be improved next time.

    Questions such as these encourage continuous improvement:

    • Which decisions produced the best results?
    • What assumptions turned out to be incorrect?
    • Where did communication break down?
    • How could testing have started earlier?
    • Which skills need further development?

    Reflection transforms individual experiences into long-term professional growth.

    Engineering Mindset Development Is a Career-Long Process

    An engineering mindset isn’t something students master before graduation. It continues evolving throughout internships, first jobs, leadership roles, and every project that introduces unfamiliar challenges.

    The engineers who continue growing are usually the ones who remain curious, ask thoughtful questions, collaborate openly, and never assume they already know everything. Technology will continue changing, but the ability to think systematically, adapt quickly, and solve meaningful problems will remain valuable regardless of the tools being used.

    FAQs: Engineering Mindset Development for Students and Early Career Professionals

    1. What is engineering mindset development?

    Engineering mindset development is the process of building structured problem-solving, critical thinking, adaptability, and systems thinking that help engineers solve real-world challenges effectively.

    2. Why is an engineering mindset important for students?

    It prepares students to apply classroom knowledge to practical situations while improving teamwork, communication, and decision-making skills valued by employers.

    3. Can engineering mindset development happen outside the classroom?

    Yes. Personal projects, internships, robotics clubs, hackathons, research opportunities, and open-source contributions all strengthen engineering thinking through practical experience.

    4. How long does it take to develop an engineering mindset?

    It develops gradually through continuous learning, hands-on practice, reflection, and repeated exposure to increasingly complex engineering challenges.

    Why the Way You Think Will Outlast Any Technology

    Programming languages, engineering software, and technical tools will continue changing throughout your career. The professionals who adapt most successfully aren’t necessarily the ones who know every new technology first. They’re the ones who approach problems with curiosity, evaluate evidence carefully, collaborate effectively, and remain willing to improve after every project. Those habits create a foundation that stays valuable regardless of how industries evolve.

    An engineering mindset isn’t built in a semester. It’s built one thoughtful decision, one project, and one lesson at a time.