How to Integrate Jitsi meet in Angular 2021 (External API, IFrame API)
Jitsi is a free and open-source multiplatform voice (VoIP), video conferencing for the web platform.
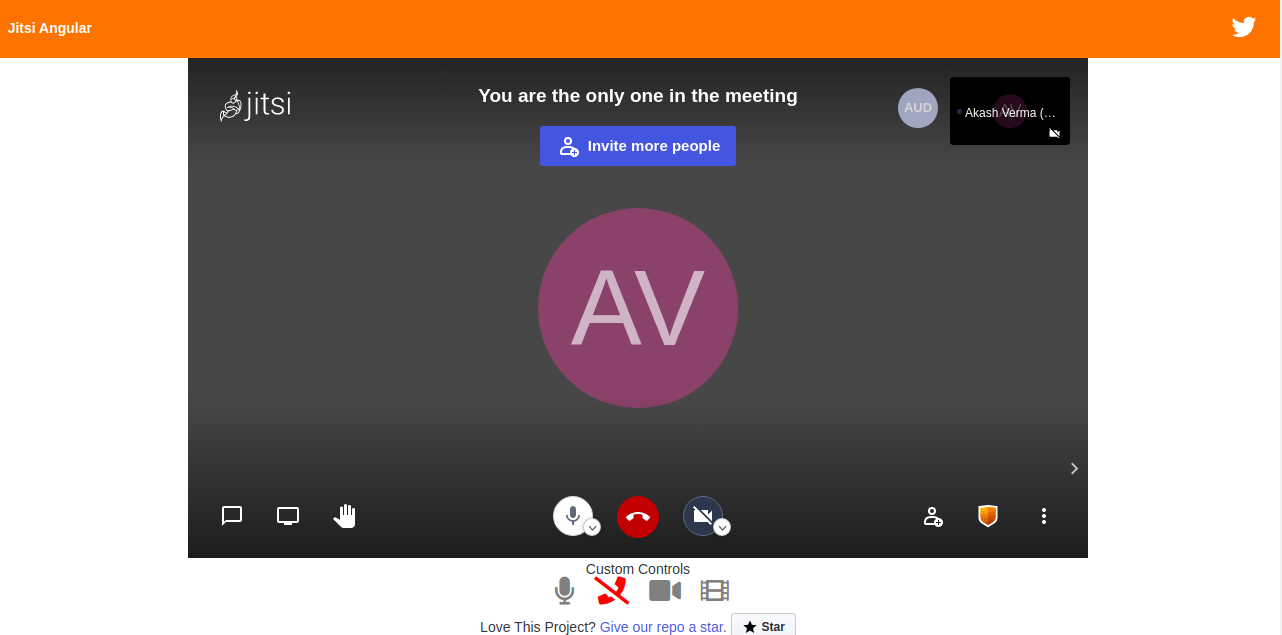
In this tutorial, I am gonna tell you how to integrate Jitsi Meet Iframe API in Angular. Also, how you can use your custom buttons for controlling Jitsi events.
Demo:- https://ultimateakash.github.io/JitsiAngular
Documentation:- https://jitsi.github.io/handbook/docs/dev-guide/dev-guide-iframe
#Step 1
To enable the Jitsi Meet API in our angular application we need to add Jitsi Meet Javascript library in index.html file.
For Self Hosted Jitsi:
<script src='https://<your-domain>/external_api.js'></script>For meet.jit.si:
<script src='https://meet.jit.si/external_api.js'></script>How to Install Jitsi Meet on Ubuntu - Self-Hosted
#Step 2
We need a component for creating the Jitsi Meet API object.
Inside the component, we need to declare JitsiMeetExternalAPI as any.
we also need to implement ngAfterViewInit life cycle hook for iframe reference.
jitsi.component.ts
import { Component, OnInit, AfterViewInit } from '@angular/core';
import { Router } from '@angular/router';
declare var JitsiMeetExternalAPI: any;

@Component({
    selector: 'app-jitsi',
    templateUrl: './jitsi.component.html',
    styleUrls: ['./jitsi.component.css']
})
export class JitsiComponent implements OnInit, AfterViewInit {
jitsi.component.html
<div id="jitsi-iframe"></div>

<!--For Custom Controls-->
<div class="item-center">
    <span>Custom Controls</span>
</div>
<div class="item-center">
    <i (click)="executeCommand('toggleAudio')" class="fas fa-2x grey-color" [ngClass]="isAudioMuted ? 'fa-microphone-slash' : 'fa-microphone'" aria-hidden="true" title="Mute / Unmute"></i>
    <i (click)="executeCommand('hangup')" class="fas fa-phone-slash fa-2x red-color" aria-hidden="true" title="Leave"></i>
    <i (click)="executeCommand('toggleVideo')" class="fas fa-2x grey-color" [ngClass]="isVideoMuted ? 'fa-video-slash' : 'fa-video'" aria-hidden="true" title="Start / Stop camera"></i>
    <i (click)="executeCommand('toggleShareScreen')" class="fas fa-film fa-2x grey-color" aria-hidden="true" title="Share your screen"></i>
</div>
#Step 3
Now Inside ngAfterViewInit() hook we need to initialize JitsiMeetExternalAPI.
export class JitsiComponent implements OnInit, AfterViewInit {

    domain: string = "meet.jit.si"; // For self hosted use your domain
    room: any;
    options: any;
    api: any;
    user: any;

    // For Custom Controls
    isAudioMuted = false;
    isVideoMuted = false;

    constructor(
        private router: Router
    ) { }

    ngOnInit(): void {
        this.room = 'bwb-bfqi-vmh'; // Set your room name
        this.user = {
            name: 'Akash Verma' // Set your username
        }
    }

    ngAfterViewInit(): void {
        this.options = {
            roomName: this.room,
            width: 900,
            height: 500,
            configOverwrite: { prejoinPageEnabled: false },
            interfaceConfigOverwrite: {
                // overwrite interface properties
            },
            parentNode: document.querySelector('#jitsi-iframe'),
            userInfo: {
                displayName: this.user.name
            }
        }

        this.api = new JitsiMeetExternalAPI(this.domain, this.options);

         // Event handlers
        this.api.addEventListeners({
            readyToClose: this.handleClose,
            participantLeft: this.handleParticipantLeft,
            participantJoined: this.handleParticipantJoined,
            videoConferenceJoined: this.handleVideoConferenceJoined,
            videoConferenceLeft: this.handleVideoConferenceLeft,
            audioMuteStatusChanged: this.handleMuteStatus,
            videoMuteStatusChanged: this.handleVideoStatus
        });
    }
We can bind multiple event handlers with this jitsi object. you can check all events in the documentation.
    handleClose = () => {
        console.log("handleClose");
    }

    handleParticipantLeft = async (participant) => {
        console.log("handleParticipantLeft", participant); // { id: "2baa184e" }
        const data = await this.getParticipants();
    }

    handleParticipantJoined = async (participant) => {
        console.log("handleParticipantJoined", participant); // { id: "2baa184e", displayName: "Shanu Verma", formattedDisplayName: "Shanu Verma" }
        const data = await this.getParticipants();
    }

    handleVideoConferenceJoined = async (participant) => {
        console.log("handleVideoConferenceJoined", participant); // { roomName: "bwb-bfqi-vmh", id: "8c35a951", displayName: "Akash Verma", formattedDisplayName: "Akash Verma (me)"}
        const data = await this.getParticipants();
    }

    handleVideoConferenceLeft = () => {
        console.log("handleVideoConferenceLeft");
        this.router.navigate(['/thank-you']);
    }

    handleMuteStatus = (audio) => {
        console.log("handleMuteStatus", audio); // { muted: true }
    }

    handleVideoStatus = (video) => {
        console.log("handleVideoStatus", video); // { muted: true }
    }

    getParticipants() {
        return new Promise((resolve, reject) => {
            setTimeout(() => {
                resolve(this.api.getParticipantsInfo()); // get all participants
            }, 500)
        });
    }
If we need custom controls then need to create a handler for emitted events.
  executeCommand(command: string) {
        this.api.executeCommand(command);;
        if(command == 'hangup') {
            this.router.navigate(['/thank-you']);
            return;
        }

        if(command == 'toggleAudio') {
            this.isAudioMuted = !this.isAudioMuted;
        }

        if(command == 'toggleVideo') {
            this.isVideoMuted = !this.isVideoMuted;
        }
    }
#Step 4
Finally, we need to start the angular development server.
ng s / ng servethen open http://localhost:4200


Leave Your Comment