

How to Implement Sanctum Authentication in Laravel 2022
Laravel Sanctum provides a convenient way to setup authentication system for single page applications, mobile applications, and simple, token based APIs.
In this article, we will implement sanctum authentication from scratch.
1. Let's create a new laravel project.
composer create-project laravel/laravel laravel-sanctum2. After creating the project install the sanctum package.
composer require laravel/sanctumNote:- Laravel 8+ versions by default comes with sanctum package installed so you don't need to install it.
3. Publish laravel sanctum config file.
php artisan vendor:publish --provider="Laravel\Sanctum\SanctumServiceProvider"This will create a sanctum.php file inside the config folder. this file contains all configurations of the sanctum. Here you can also set the lifetime(in minutes) of an access token.
sanctum.php
/*
|--------------------------------------------------------------------------
| Expiration Minutes
|--------------------------------------------------------------------------
|
| This value controls the number of minutes until an issued token will be
| considered expired. If this value is null, personal access tokens do
| not expire. This won't tweak the lifetime of first-party sessions.
|
*/

'expiration' => null,
4. Update your database credentials in .env file.
DB_DATABASE=laravel-sanctum  // your database name
DB_USERNAME=root            // your database username
DB_PASSWORD=               // your database password
5. Next we need to create personal_access_tokens table to store tokens. so publish the create_personal_access_tokens_table.php migration file.
php artisan vendor:publish --tag=sanctum-migrationsNote:- Laravel 8+ by default comes with xxxx_create_personal_access_tokens_table.php migration file so you don't need to publish it.
This command will generate xxxx_create_personal_access_tokens_table.php inside database/migrations directory.
6. Run migration
php artisan migrateThis command will migrate all migrations from database/migrations directory.
if you don't want to migrate all migration you can also only migrate create_personal_access_tokens_table.php
php artisan migrate  --path=your migration file path

php artisan migrate  --path=database/migrations/2019_12_14_000001_create_personal_access_tokens_table.php
7. Update your User model.
go to app/Models and open User.php file. after that add Laravel\Sanctum\HasApiTokens trait. This trait will provide a few helper methods to your model which allow you to inspect the authenticated user's token and scopes.
Note:- Laravel 8+ by default has a Laravel\Sanctum\HasApiTokens trait. so you don't need to import it.
<?php

namespace App\Models;

use Illuminate\Contracts\Auth\MustVerifyEmail;
use Illuminate\Database\Eloquent\Factories\HasFactory;
use Illuminate\Foundation\Auth\User as Authenticatable;
use Illuminate\Notifications\Notifiable;
use Laravel\Sanctum\HasApiTokens;

class User extends Authenticatable
{
    use HasApiTokens, HasFactory, Notifiable;
8. Create the AuthController.
php artisan make:controller Api/AuthControllerNote:- Here Api is the folder name.
This will create AuthController.php inside app/Http/Controllers/Api directory
9. Update AuthController.php
<?php
namespace App\Http\Controllers\Api;
use App\Http\Controllers\Controller;
use Illuminate\Support\Facades\Validator;
use Illuminate\Http\Request;
use App\Models\User;
class AuthController extends Controller
{
public function register(Request $request)
{
$validator = Validator::make($request->all(), [
'name' => 'required',
'email' => 'required|email|unique:users',
'password' => 'required'
]);
if ($validator->fails()) {
return response()->json($validator->errors(), 400);
}
$user = new User();
$user->name = $request->name;
$user->email = $request->email;
$user->password = bcrypt($request->password);
$user->save();
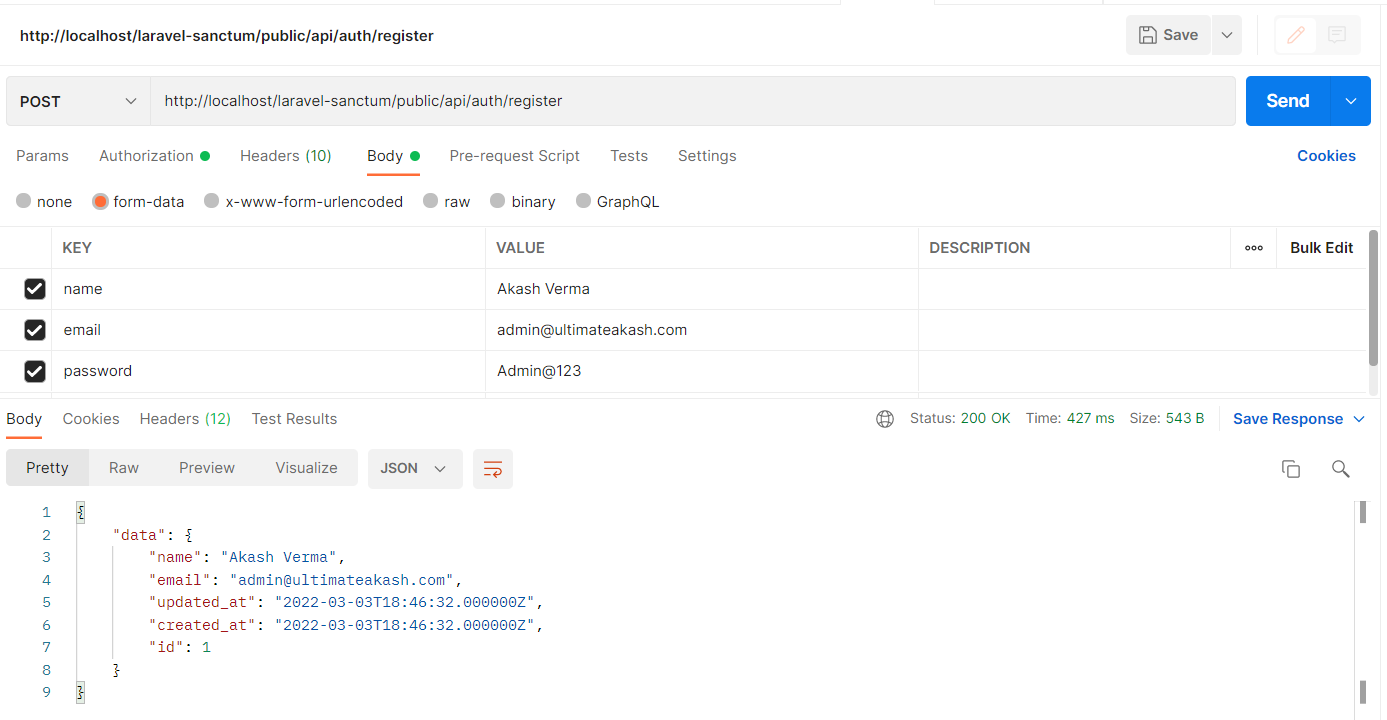
return response()->json(['data' => $user]);
}
public function login(Request $request)
{
$credentials = $request->only(['email', 'password']);
$validator = Validator::make($credentials, [
'email' => 'required|email',
'password' => 'required'
]);
if ($validator->fails()) {
return response()->json($validator->errors(), 400);
}
if (!auth()->attempt($credentials)) {
return response()->json(['error' => 'Unauthorized'], 401);
}
/* ------------ Create a new personal access token for the user. ------------ */
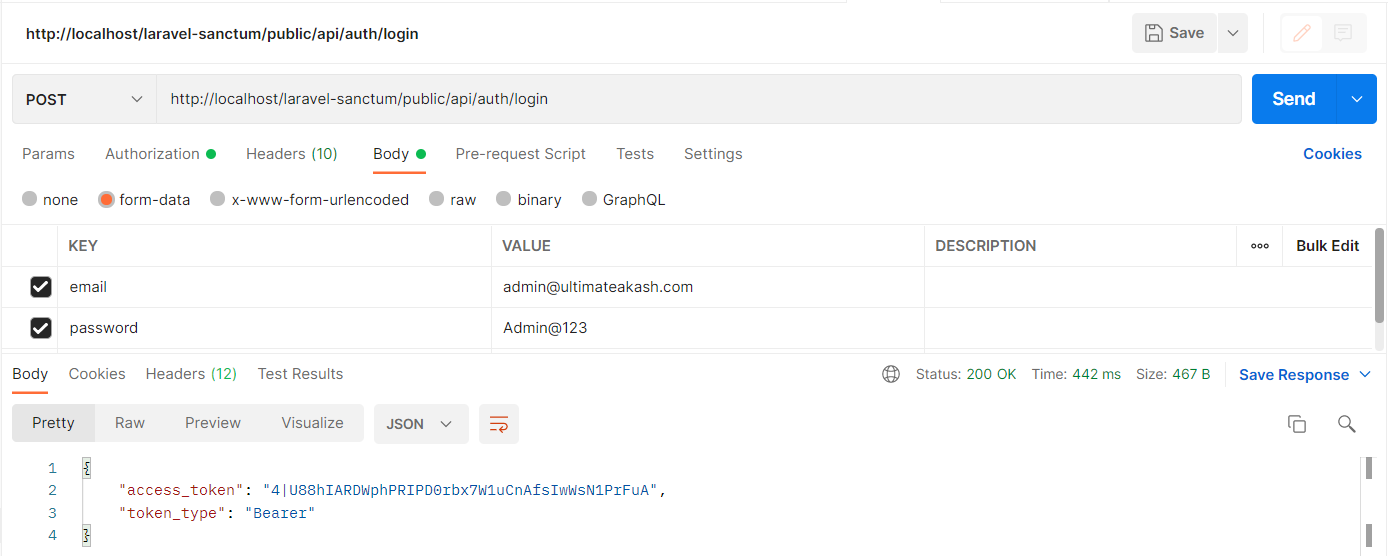
$token = auth()->user()->createToken('MyApiToken')->plainTextToken;
return response()->json([
'access_token' => $token,
'token_type' => 'Bearer'
]);
}
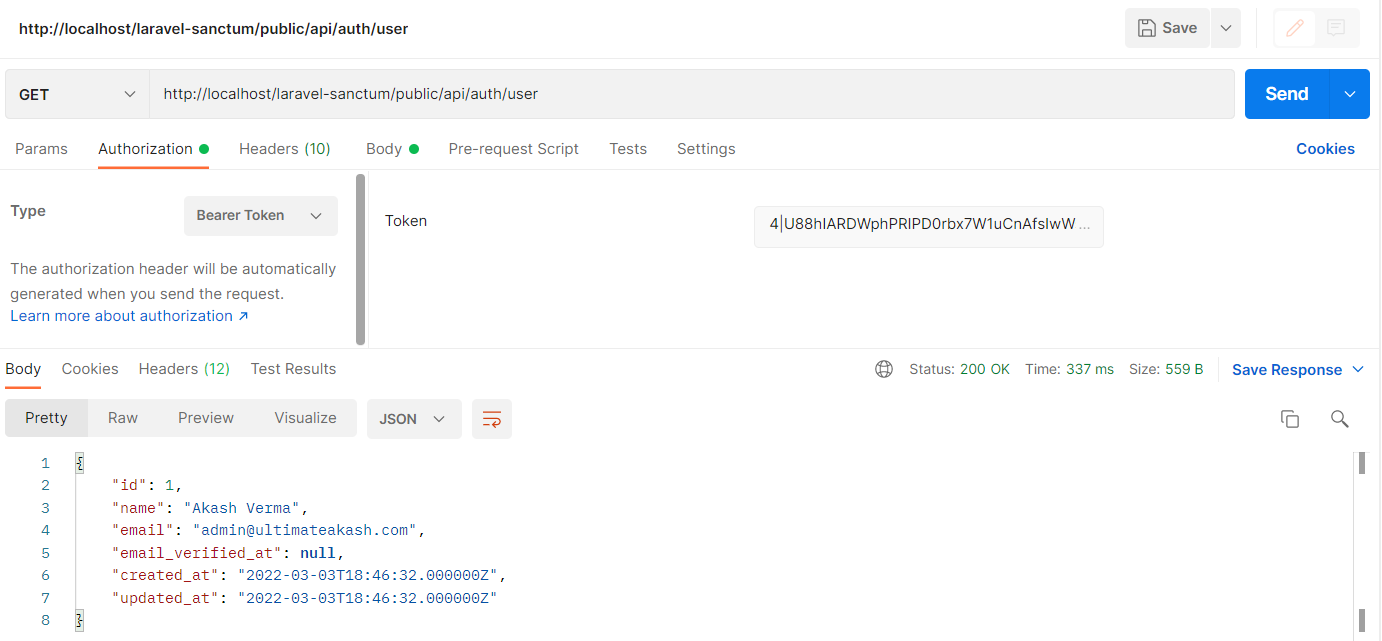
public function getUser()
{
return response()->json(auth()->user());
}
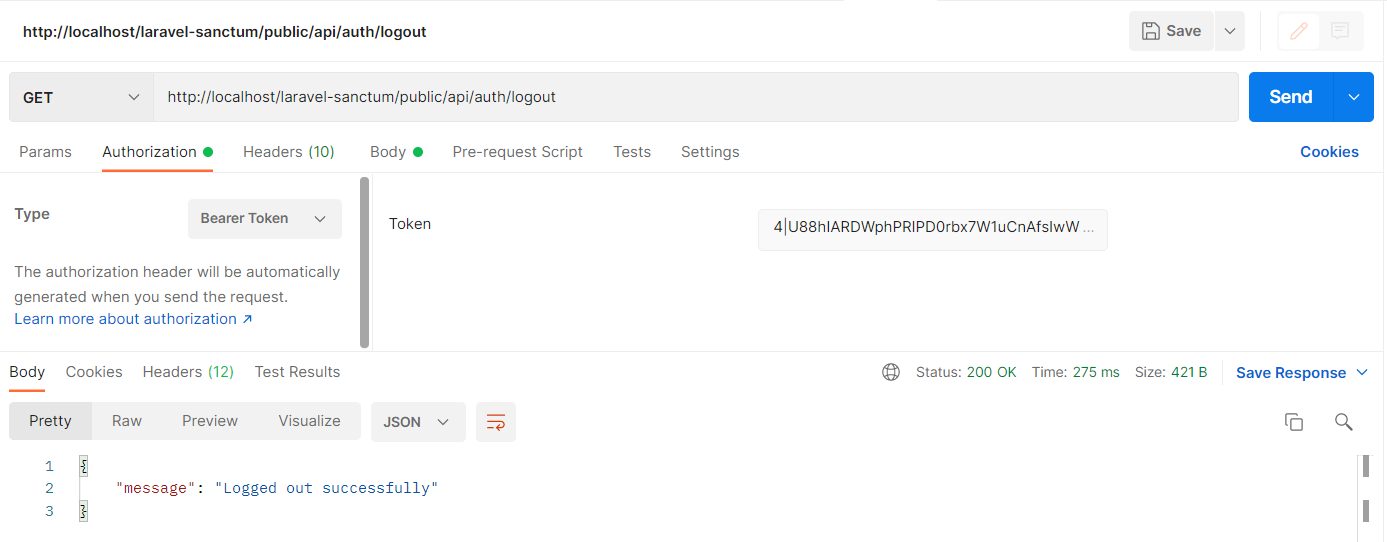
public function logout()
{
/* --- Revoke the token that was used to authenticate the current request. -- */
auth()->user()->currentAccessToken()->delete();
return response()->json(['message' => 'Logged out successfully']);
}
}Note:- If you need to logout from all devices of a user.
// Revoke all tokens...
auth()->user()->tokens()->delete();
10. Go to app/Providers and open RouteServiceProvider.php. uncomment $namespace;
protected $namespace = 'App\\Http\\Controllers';11. Go to app/Http/Middleware and open Authenticate.php. After that update redirectTo() method.
<?php

namespace App\Http\Middleware;

use Illuminate\Auth\Middleware\Authenticate as Middleware;

class Authenticate extends Middleware
{
    /**
     * Get the path the user should be redirected to when they are not authenticated.
     *
     * @param  \Illuminate\Http\Request  $request
     * @return string|null
     */
    protected function redirectTo($request)
    {
        if ($request->is('api/*')) {
            return route('unauthorized');
        }
        if (! $request->expectsJson()) {
            return route('login');
        }
    }
}
Note:- In the case of Unauthenticated(API) instead of redirecting to the login page we are redirecting to unauthorized route for the custom JSON response.
12. Go to routes folder and update api.php
<?php

use Illuminate\Support\Facades\Route;

Route::group(['prefix' => 'auth', 'namespace' => 'Api'], function () {

    Route::post('register',     'AuthController@register');
    Route::post('login',        'AuthController@login');

    Route::group(['middleware' => 'auth:sanctum'], function () {
        Route::get('logout',    'AuthController@logout');
        Route::get('user',      'AuthController@getUser');
    });

    Route::any('{segment}', function () {
        return response()->json(['error' => 'Bad request.'], 400);
    })->where('segment', '.*');
});

Route::get('unauthorized', function () {
    return response()->json(['error' => 'Unauthorized.'], 401);
})->name('unauthorized');
Finally Open Postman or any REST API Client and test these API's
Checkout my full laravel-sanctum example.
https://github.com/ultimateakash/laravel-sanctum
If you need any help, don't hesitate to comment below.
Thanks.


Leave Your Comment