How To Implement Queue In Laravel 2022
Laravel queues provide a unified queueing API across a variety of different queue backends, such as Amazon SQS, Redis, or even a relational database.
It's better to use queue if you need to perform any time-consuming task(Example- Send Email). By Implementing queue we can perform these tasks in the background.
In this article, we will implement queue in laravel step by step.
1. Let's create a new laravel project.
composer create-project laravel/laravel laravel-queue2. Update your database credentials in .env file.
DB_DATABASE=laravel-queue    // your database name
DB_USERNAME=root            // your database username
DB_PASSWORD=               // your database password
3. Update queue connection in .env file.
QUEUE_CONNECTION=database4. Generate migration file for jobs table.
Note:- laravel by default usage jobs table for storing queue's data and failed_jobs table for failed queue's data if you want to use another table instead of jobs you can change it from config file.
Ref:- Illuminate\Queue\Console\TableCommand
config/queue.php
'database' => [
    'driver' => 'database',
    'table' => 'jobs',        // here you can change table name
    'queue' => 'default',
    'retry_after' => 90,
    'after_commit' => false,
],

'failed' => [
    'driver' => env('QUEUE_FAILED_DRIVER', 'database-uuids'),
    'database' => env('DB_CONNECTION', 'mysql'),
    'table' => 'failed_jobs',  // here you can change table name
],
Hit the following command to generate queue table migration
php artisan queue:tableThis command will generate xxxx_create_jobs_table.php(based on the name set in queue.php) inside database/migrations directory.
Note:- laravel by default comes with xxxx_create_failed_jobs_table.php migration file so you don't need to generate migration for the failed_jobs table.
If you changed failed_jobs table in queue.php then you also need to generate migration for failed queues
php artisan queue:failed-table5. Run migration
php artisan migrateThis command will migrate all migrations from database/migrations directory.
if you don't want to migrate all migration you can also only migrate queue tables.
php artisan migrate  --path=your migration file path

php artisan migrate  --path=database/migrations/2022_01_31_120052_create_jobs_table.php
php artisan migrate  --path=database/migrations/2019_08_19_000000_create_failed_jobs_table.php
6. Create a queue job.
php artisan make:job WelcomeEmailJobThis command will create WelcomeEmailJob.php inside app/Jobs directory.
7. Update handle method of WelcomeEmailJob.php.
<?php

namespace App\Jobs;

use Illuminate\Bus\Queueable;
use Illuminate\Contracts\Queue\ShouldBeUnique;
use Illuminate\Contracts\Queue\ShouldQueue;
use Illuminate\Foundation\Bus\Dispatchable;
use Illuminate\Queue\InteractsWithQueue;
use Illuminate\Queue\SerializesModels;
use Illuminate\Support\Facades\Mail;

class WelcomeEmailJob implements ShouldQueue
{
    use Dispatchable, InteractsWithQueue, Queueable, SerializesModels;
    private $userData;
    /**
     * Create a new job instance.
     *
     * @return void
     */
    public function __construct($userData)
    {
        $this->userData = $userData;
    }

    /**
     * Execute the job.
     *
     * @return void
     */
    public function handle()
    {
        Mail::raw("Welcome {$this->userData['name']}", function($message) {
            $message->to($this->userData['email'])->subject('Laravel Queue');
        });
    }
}
8. Update Email credentials in .env file
MAIL_MAILER=smtp
MAIL_HOST=smtp.gmail.com
MAIL_PORT=587
MAIL_USERNAME=your_email@gmail.com
MAIL_PASSWORD=xxxxxxxxx
MAIL_ENCRYPTION=tls
MAIL_FROM_ADDRESS=your_email@gmail.com
MAIL_FROM_NAME="${APP_NAME}"
9. Create a UserController for dispatching queue jobs.
php artisan make:controller UserController10. Open UserController.php and create a function for dispatching WelcomeEmailJob
<?php

namespace App\Http\Controllers;

use App\Jobs\WelcomeEmailJob;
use Illuminate\Http\Request;

class UserController extends Controller
{
    public function sendMail()
    {
        $userData = [
            'name' => 'Akash Verma',
            'email' => 'akashmjp@gmail.com'
        ];
        WelcomeEmailJob::dispatch($userData);
        die('Email Sent.');
    }
}
Note:- we can dispatch queue jobs by 4 ways.
Queue::push(new WelcomeEmailJob($userData)); dispatch(new WelcomeEmailJob($userData));(new WelcomeEmailJob($userData))->dispatch();WelcomeEmailJob::dispatch($userData);By default dispatch job on the default queue. if you want to dispatch a job on a specific queue then you can use onQueue() method.
WelcomeEmailJob::dispatch($userData)->onQueue('mailqueue');11. Create a route for calling sendMail() function.
<?php

use App\Http\Controllers\UserController;
use Illuminate\Support\Facades\Route;

/*
|--------------------------------------------------------------------------
| Web Routes
|--------------------------------------------------------------------------
|
| Here is where you can register web routes for your application. These
| routes are loaded by the RouteServiceProvider within a group which
| contains the "web" middleware group. Now create something great!
|
*/

Route::get('/send-mail', [UserController::class, 'sendMail']);
12. Start queue worker
php artisan queue:workif you have pushed your job on a specific queue then
php artisan queue:work --queue=mailqueue // job queue name13. Finally hit send mail route in browser and check queue worker logs in the console.
http://localhost/laravel-queue/public/send-mail
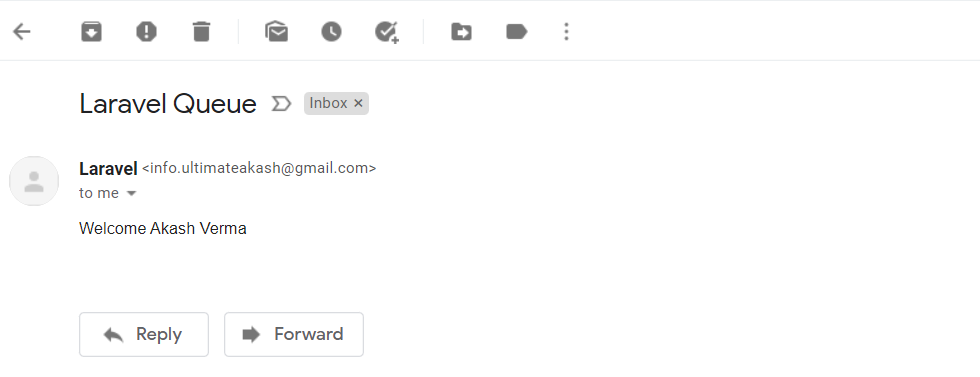
2022-01-31 14:49:21][21] Processed: App\Jobs\WelcomeEmailJob - Indicates our queue job processed successfully.
Check out this Link - How to Run Laravel Queue Worker on Server
If you facing any issues. don't hesitate to comment below. I will be happy to help you.







Leave Your Comment