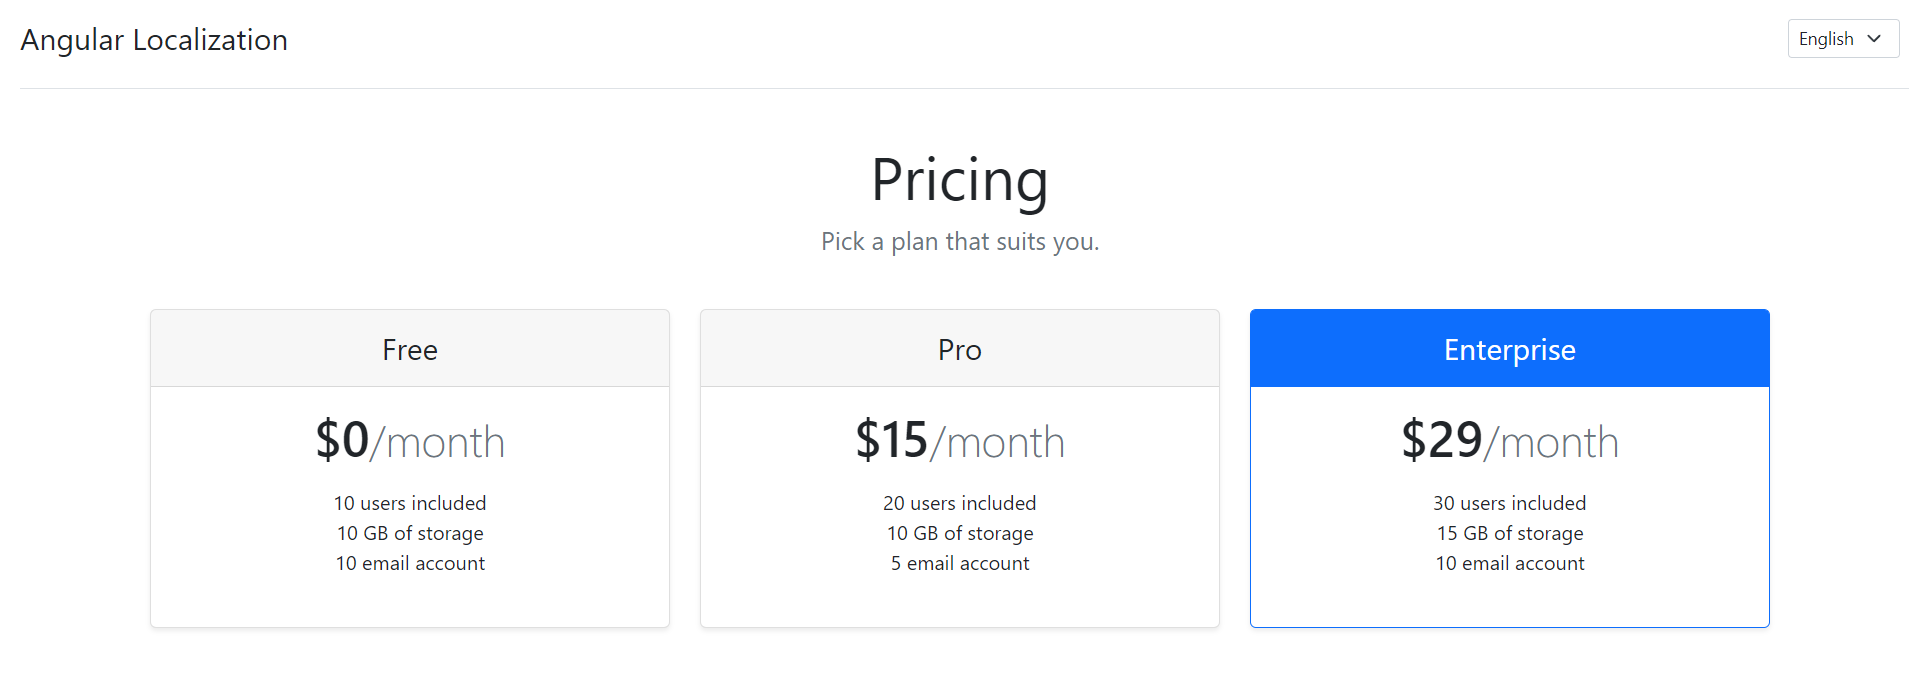
How to Implement localization in Angular 2022
ngx-translate is an internationalization library for Angular. It lets you define translations for your content in different languages and switch between them easily. In this tutorial, we will implement localization in angular project step by step.
1. Let's install @angular/cli package.
npm install -g @angular/cli2. Create a new angular project
ng new angular-localizationNote:- In this tutorial, we will use bootstrap free pricing template - Pricing example for Bootstrap (getbootstrap.com)
3. After creating our project integrate the above html template. (checkout github repo)
<!-- app.component.html -->
<app-header></app-header>
<div class="container">
	<app-home></app-home>
</div>
4. Install @ngx-translate/core and some dependencies.
npm install @ngx-translate/core @ngx-translate/http-loader5. Create i18n folder inside assets for storing translation files. inside i18n folder en.json and fr.json for storing english and french translations.
/src
   /assets
         /i18n
             en.json
             fr.json
6. Now we need to update our translation based on our components(html).
//en.json
{
    "plan_title": "Pricing",
    "plan_text": "Pick a plan that suits you.",
    "free": "Free",
    "pro": "Pro",
    "month": "month",
    "enterprise": "Enterprise",
    "users_included": "{{total}} users included",
    "storage_included": "{{total}} GB of storage",
    "email_included": "{{total}} email account"
}

//fr.json
{
    "plan_title": "Prix",
    "plan_text": "Choisissez un plan qui vous convient.",
    "free": "libre",
    "pro": "Pro",
    "month": "mois",
    "enterprise": "Enterprise",
    "users_included": "{{total}} utilisateurs inclus",
    "storage_included": "{{total}} Go de stockage",
    "email_included": "{{total}} compte de messagerie"
}
Note: for the dynamic value, we need to use curly braces {{variable}}
7. Next. we need to import TranslateModule in AppModule and setup TranslateHttpLoader for loading translation from "/assets/i18n/[lang].json"
app.module.ts
import { NgModule } from '@angular/core';
import { BrowserModule } from '@angular/platform-browser';
import { TranslateLoader, TranslateModule } from '@ngx-translate/core';
import { HttpClient, HttpClientModule } from '@angular/common/http';
import { TranslateHttpLoader } from '@ngx-translate/http-loader';

import { AppRoutingModule } from './app-routing.module';
import { AppComponent } from './app.component';
import { HomeComponent } from './components/pages/home/home.component';
import { HeaderComponent } from './components/comman/header/header.component';

export function HttpLoaderFactory(httpClient: HttpClient) {
    return new TranslateHttpLoader(httpClient);
}
@NgModule({
    declarations: [
        AppComponent,
        HomeComponent,
        HeaderComponent
    ],
    imports: [
        BrowserModule,
        HttpClientModule,
        TranslateModule.forRoot({
            defaultLanguage: 'en',
            loader: {
                provide: TranslateLoader,
                useFactory: HttpLoaderFactory,
                deps: [HttpClient]
            }
        }),
        AppRoutingModule
    ],
    providers: [],
    bootstrap: [AppComponent]
})
export class AppModule { }
8. ngx-translate provides 3 ways for handling translation.
(a). TranslateService
export class ExampleComponent implements OnInit {

    constructor(private translate: TranslateService) { }

    ngOnInit(): void {
        this.translate.stream('plan_title').subscribe((res: string) => {
            console.log(res);
            //=> Pricing
        });

        this.translate.stream('users_included', { total: 10 }).subscribe((res: string) => {
            console.log(res);
            //=> 10 users included
        });
    }
}
(b). TranslatePipe
export class ExampleComponent implements OnInit {

    param = { total: 10 };

    constructor() { }

    ngOnInit(): void { }
}
<li>{{ 'plan_title' | translate }}</li>
<li>{{ 'users_included' | translate:param }}</li>(c). TranslateDirective
<li [translate]="'users_included'" [translateParams]="{'total' : 10 }"></li>or even simpler
<li translate [translateParams]="{'total' : 10 }">users_included</li>
<li translate>plan_title</li>
9. Finally open HomeComponent of our project and replace hardcoded text with translation keys.
home.component.html
<div class="pricing-header p-3 pb-md-4 mx-auto text-center">
    <h1 class="display-5 fw-normal">{{ 'plan_title' | translate }}</h1>
    <p class="fs-5 text-muted">{{ 'plan_text' | translate }}</p>
</div>
<main>
    <div class="row row-cols-1 row-cols-md-3 mb-3 text-center">
        <div class="col">
            <div class="card mb-4 rounded-3 shadow-sm">
                <div class="card-header py-3">
                    <h4 class="my-0 fw-normal">{{ 'free' | translate }}</h4>
                </div>
                <div class="card-body">
                    <h1 class="card-title pricing-card-title">$0<small class="text-muted fw-light">/{{ 'month' | translate }}</small></h1>
                    <ul class="list-unstyled mt-3 mb-4">
                        <li [translate]="'users_included'" [translateParams]="{'total' : 10 }"></li>
                        <li [translate]="'storage_included'" [translateParams]="{'total' : 10 }"></li>
                        <li [translate]="'email_included'" [translateParams]="{'total' : 10 }"></li>
                    </ul>
                </div>
            </div>
        </div>
        <div class="col">
            <div class="card mb-4 rounded-3 shadow-sm">
                <div class="card-header py-3">
                    <h4 class="my-0 fw-normal">Pro</h4>
                </div>
                <div class="card-body">
                    <h1 class="card-title pricing-card-title">$15<small class="text-muted fw-light">/{{ 'month' | translate }}</small></h1>
                    <ul class="list-unstyled mt-3 mb-4">
                        <li [translate]="'users_included'" [translateParams]="{'total' : 20 }"></li>
                        <li [translate]="'storage_included'" [translateParams]="{'total' : 10 }"></li>
                        <li [translate]="'email_included'" [translateParams]="{'total' : 5 }"></li>
                    </ul>
                </div>
            </div>
        </div>
        <div class="col">
            <div class="card mb-4 rounded-3 shadow-sm border-primary">
                <div class="card-header py-3 text-white bg-primary border-primary">
                    <h4 class="my-0 fw-normal">Enterprise</h4>
                </div>
                <div class="card-body">
                    <h1 class="card-title pricing-card-title">$29<small class="text-muted fw-light">/{{ 'month' | translate }}</small></h1>
                    <ul class="list-unstyled mt-3 mb-4">
                        <li [translate]="'users_included'" [translateParams]="{'total' : 30 }"></li>
                        <li [translate]="'storage_included'" [translateParams]="{'total' : 15 }"></li>
                        <li [translate]="'email_included'" [translateParams]="{'total' : 10 }"></li>
                    </ul>
                </div>
            </div>
        </div>
    </div>
</main>
10. Now we need to create a select box so users are able to switch languages. open HeaderComponent make changes like this
header.component.ts
import { Component, OnInit } from '@angular/core';
import { TranslateService } from '@ngx-translate/core';

@Component({
    selector: 'app-header',
    templateUrl: './header.component.html',
    styleUrls: ['./header.component.css']
})
export class HeaderComponent implements OnInit {

    constructor(private translate: TranslateService) { }

    ngOnInit(): void { }

    handleLanguage = (event: any) => {
        this.translate.use(event.target.value);
    }
}
header.component.html
<select class="form-select form-select-sm language-switcher" (click)="handleLanguage($event)">
    <option value="en">English</option>
    <option value="fr">French</option>
</select>
Note:- You can print get the current language from translate object.
console.log(translate.currentLang) //enYou can also listen to language change by onLangChange observable
this.translate.onLangChange.subscribe((event: LangChangeEvent) => {
    console.log(event)
});
11. Finally run the project.
ng serveopen http://localhost:4200 in the browser and try to change the language.


Leave Your Comment